Registers
The Registers module allows you to maintain data in tabular form. You can adapt a register’s structure to the information it contains by defining column names and types. For example, a vehicle register can include the brand, model, manufacture year, mileage, driver, and purchase or disposal dates.
Individual rows in the table are called entries. You can link an action plan to an entry and save the register’s structure as a template for future use.
User permissions
The general rules for assigning roles are described in User permissions - Roles. The following sections explain how they apply to the Registers module.
Access to registers depends on assigned roles, ownership, and permissions granted within a specific register. Full management permissions include working with entries, changing settings and columns, managing participants, deleting the register, and resetting entry versions.
Permissions can come from several sources at the same time. The owner and participant restrictions described below apply when the user does not have wider permissions from another source.
Registers Author
A user with permission to create registers and fully manage the registers they have created. This role does not grant access to registers created by other authors. Access to those registers may be granted by assigning the user as the register owner or a participant, within the scope described below.
Registers Manager
A user with permission to create registers and fully manage all registers within their organizational structure. These permissions cover the user’s organizational units and all subordinate units.
The role can also be assigned within a competency center. In that case, it covers the center’s entire subtree.
A Registers Manager also has full management permissions for registers they have created or own.
💡 The Registers Author and Registers Manager roles are available in the role selector only if the license includes the Registers module.
General roles and access to registers
Permissions to access registers may also come from general roles:
| Role | Permissions in the Registers module |
|---|---|
| Administrator | The same as a Registers Manager within their organizational structure. Access may also be granted through an assignment in a competency center. |
| Manager | The same as a Registers Manager within their organizational structure. |
| Action Plan Author | The same as a Registers Author: creating registers and fully managing the registers they have created. |
| Participant | This role alone does not grant any permissions to registers. |
Membership in a register’s organizational unit alone does not grant access to that register.
Register owner
By default, the register owner is the user who created it. You can change the owner in the register settings or by using the owner badge in the header. The register inherits its organizational unit from the owner.
The register owner can view the register and add, edit, and delete entries. Ownership alone does not grant full management permissions: the user cannot change settings or columns, add participants, delete the register, or reset entry versions.
For example, a user who creates a register with the Registers Author role retains full management permissions through that role even if they change the register’s owner.
Register participants
Participants are added to a specific register in the Contributors section of its settings. You can select users or groups and grant them access regardless of the organizational structure:
- Read - view the register and its entries.
- Write - fully manage the register, including its settings, columns, and participants, as well as delete the register and reset entry versions.
⚠️ Participation in a specific register is separate from the Participant role. The role alone does not grant access to registers, whereas Write permission granted within a register provides full management permissions.
Entry owner
An entry owner is the person specified in a particular row of the register. They do not need a role that grants access to registers. This assignment allows them to view the register, but only their own entries. They can edit those entries but cannot add or delete entries.
Registers list
To display the registers list, select the Registers tab in the left menu bar, then select Registers in the Workspace section.
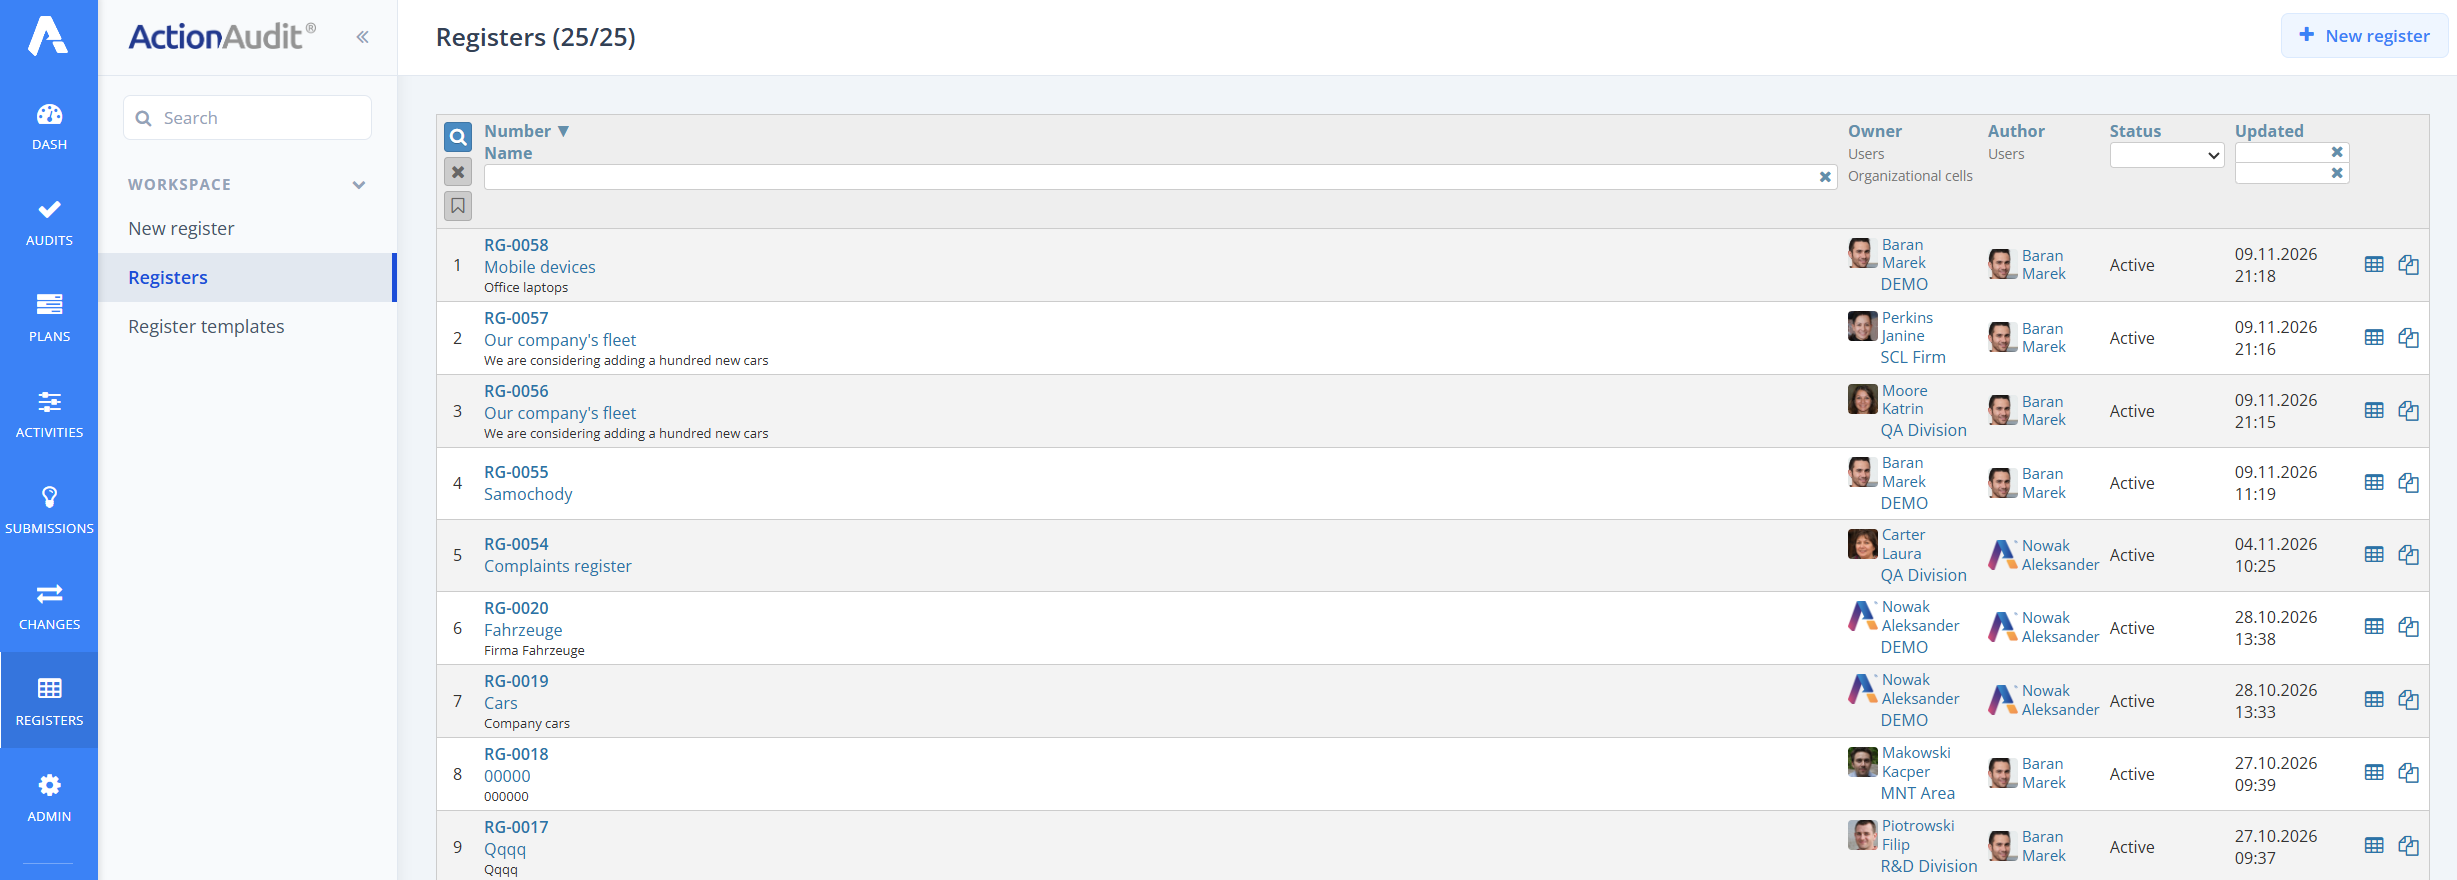
The list displays the following information:
- Number and name - the register’s identifier, name, and description.
- Owner - the user responsible for the register and their organizational unit.
- Author - the user who created the register.
- Status - the register’s status, e.g. Active.
- Updated - the date and time of the last update.
The fields in the table header allow you to search for registers by number or name and filter them by owner, author, status, and update date. For a detailed description of filters, see Data filtering.
To open a register, click its number or name. The + New register button in the upper-right corner allows you to create another register.
Creating a new register
To create a register, click + New register in the registers list or select New register in the left menu bar.
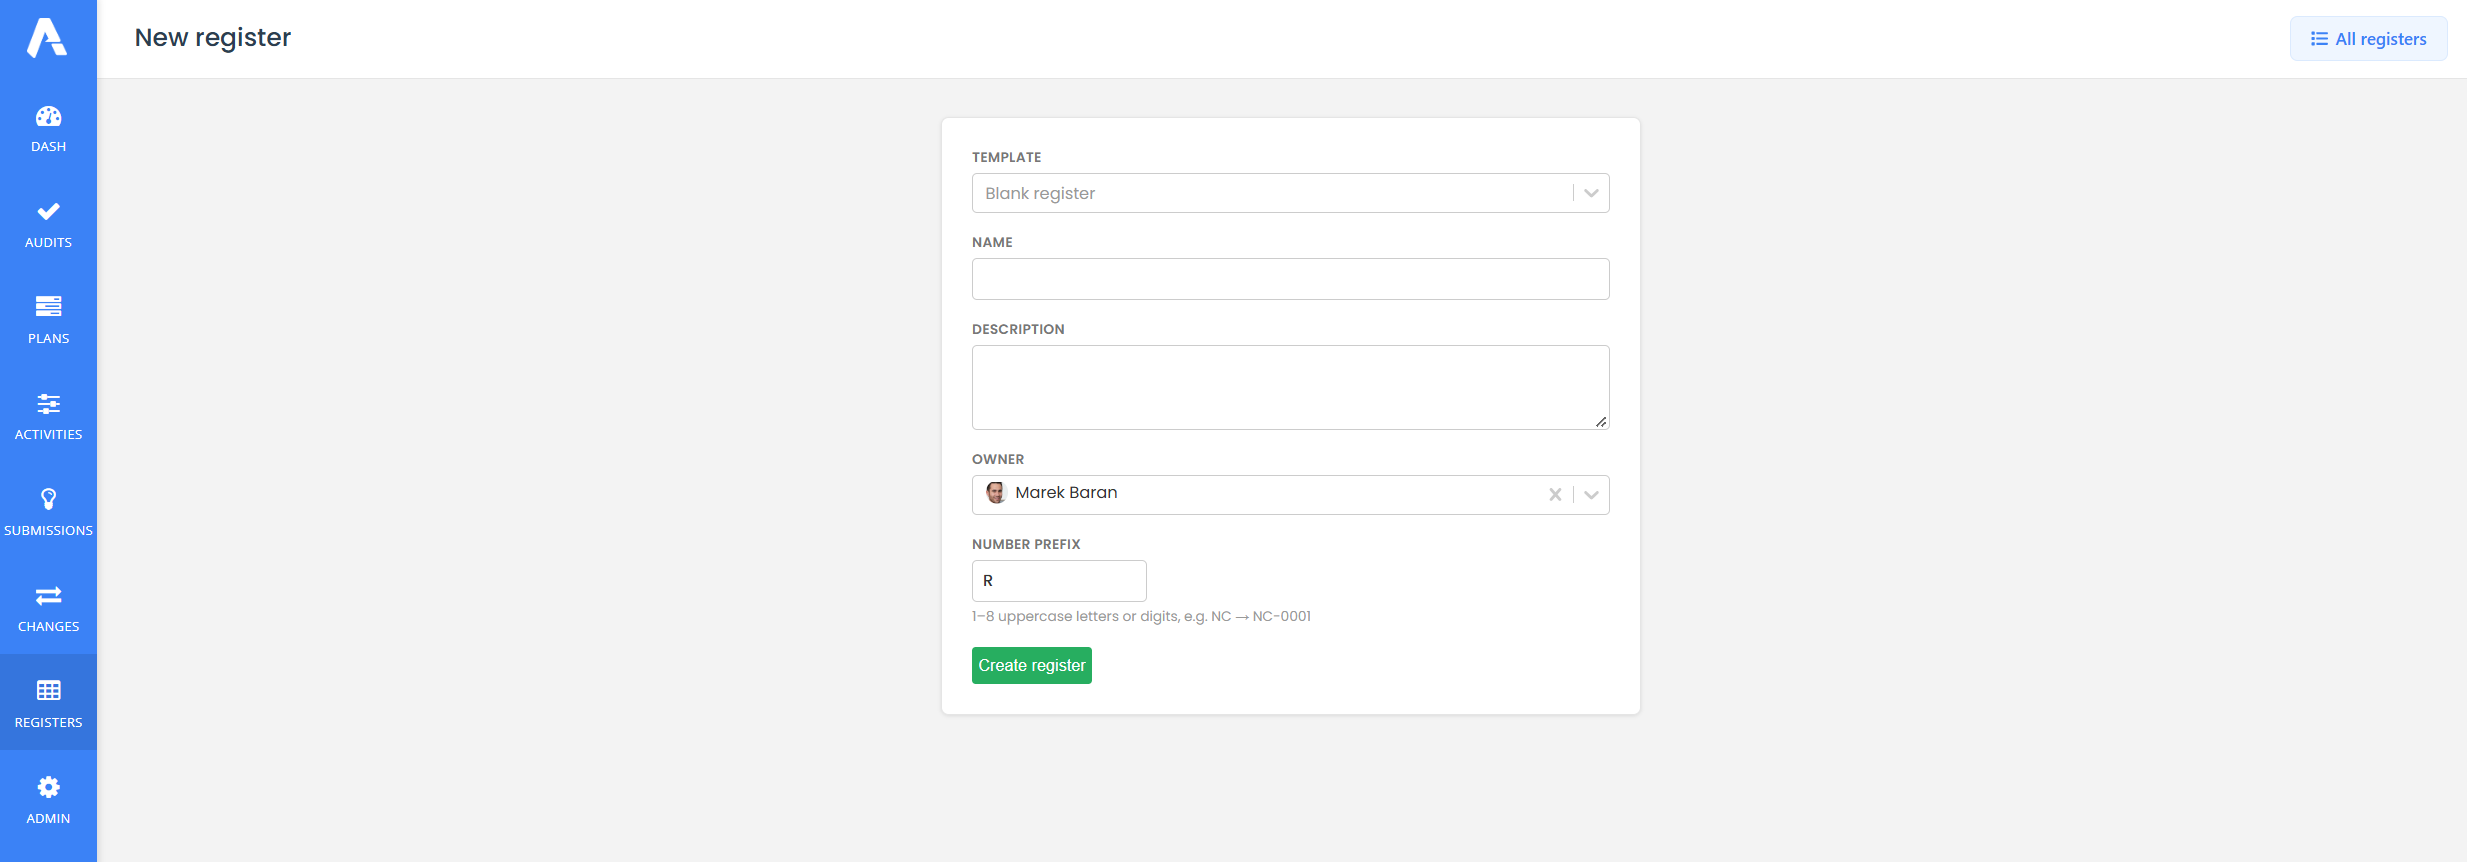
The form contains the following fields:
- Template - select Blank register or a previously saved template.
- Name - a name that identifies the register in the list.
- Description - additional information about the register’s purpose.
- Owner - the user responsible for the register. By default, this is the user who created it. You can change the owner in the settings or by using the owner badge in the header. The register inherits its organizational unit from the owner. The scope of access is described in User permissions.
- Number prefix - the prefix used in entry numbers. It must contain 1 to 8 uppercase letters or digits. For example, the prefix NC is used in the number NC-0001, as shown in the hint below the field.
The example shows Blank register selected, Marek Baran as the owner, and R as the number prefix.
To create a new register:
- Select Blank register or a template.
- Enter a name and description, and select the owner.
- Set the number prefix.
- Click the green Create register button.
The All registers button in the upper-right corner returns you to the list.
Register view
Opening a register displays a table of its entries. The register’s number, name, description, and owner information appear at the top of the screen.
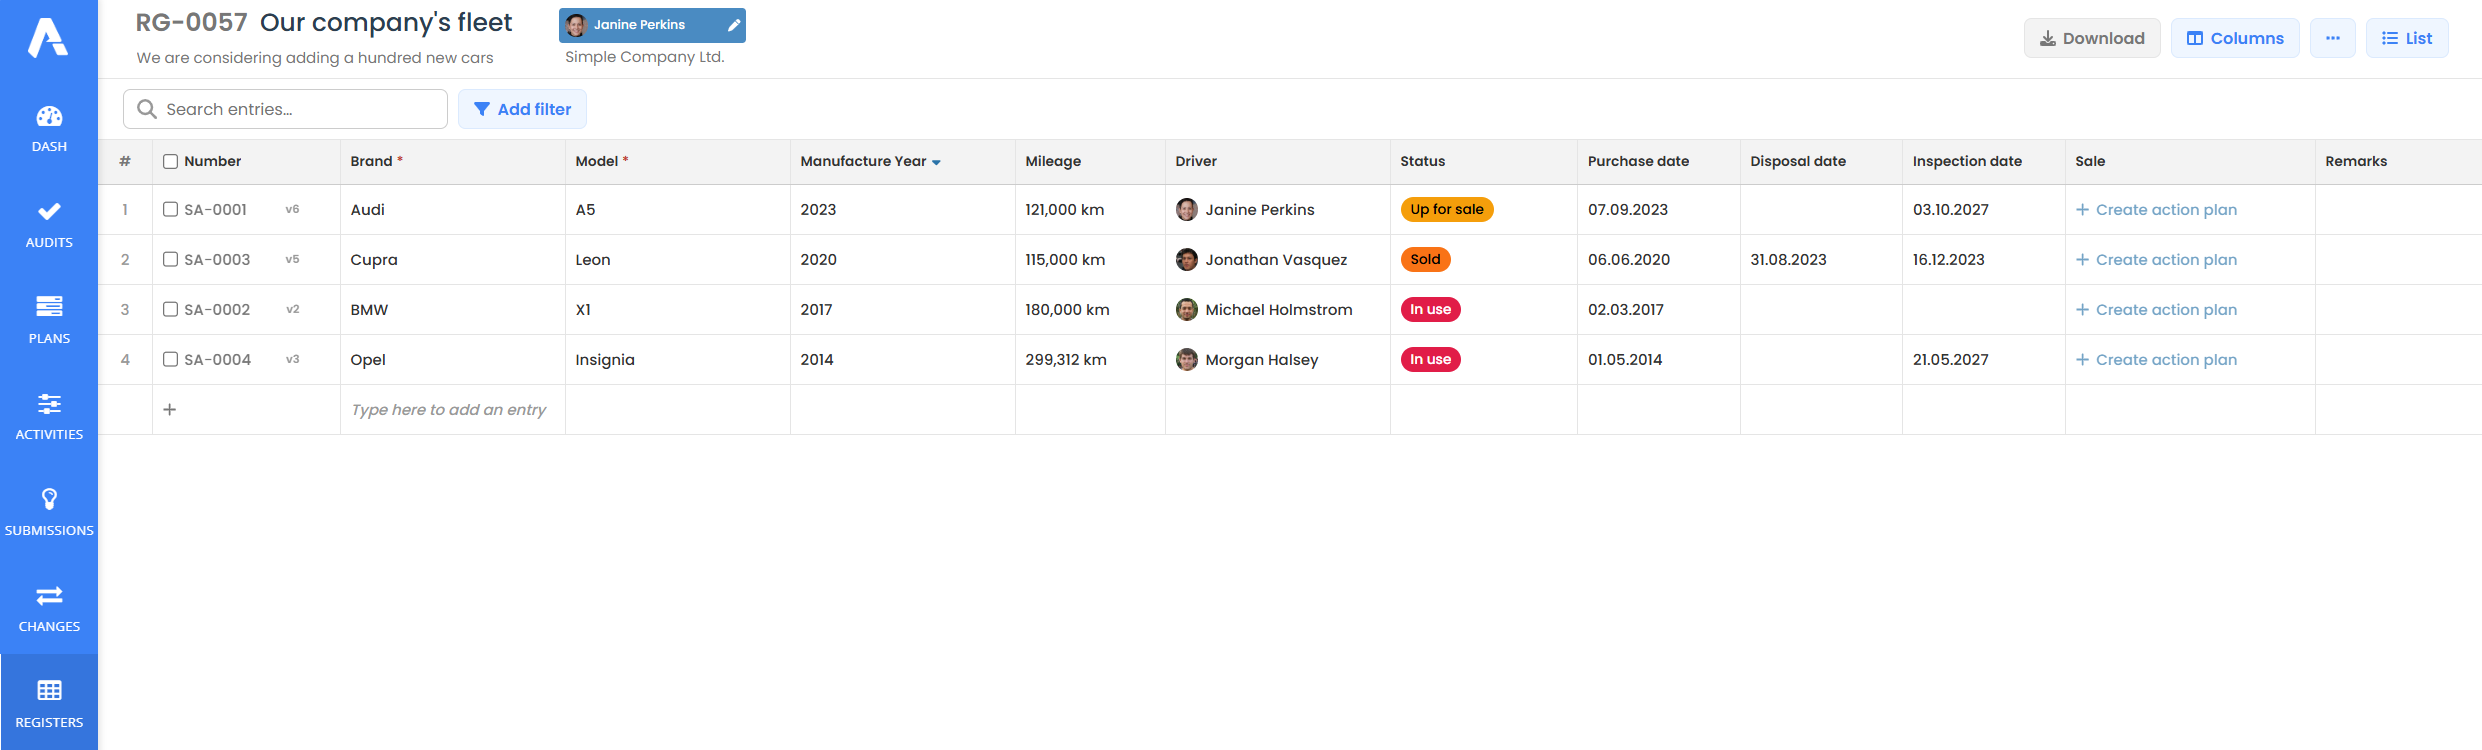
Each row represents one entry, and the columns define the information stored. The example shows register RG-0057, named Our company’s fleet, with Janine Perkins as its owner. Its visible entries use the SA prefix, e.g. SA-0001. The v2, v3, v5, and v6 labels next to entry numbers indicate their versions.
⚠️ Each time an entry is saved, its version number increases, allowing you to review changes in the entry’s history. The version reset button removes the ability to compare entry versions and sets the current version of every entry as version 1. Resetting versions completely deletes each entry’s history.
The following buttons are available in the upper-right corner:
- Download - export the register as an .xlsx file.
- Columns - manage the column structure and visibility.
- … - additional register options.
- List - return to the registers list.
Adding and completing entries
An empty row marked with a + symbol appears at the bottom of the table. To start adding an entry, select the field with the Type here to add an entry placeholder and enter the data.
Fill in each column according to its type. For example, enter a number in the Mileage column, select a user in the Driver column, or select a date in the Purchase date column. A red asterisk next to a column name indicates that the field is required.
Searching and filtering entries
The Search entries… field above the table allows you to search the register’s data. To limit the entries displayed using a filter condition, click Add filter.
You can also filter entries by opening a column’s menu and selecting Filter by this column.
Action plans linked to entries
An entry can be linked to an action plan. In the example shown, the Sale column is used for this purpose.
If no plan has been created for an entry, its row displays + Create action plan. In the screenshot, this option appears in the Sale column for all four visible entries. When a plan is linked to an entry, its number and status are displayed.
Managing columns
To configure the register’s columns, click Columns in the upper-right corner of the register view. This opens a panel listing the columns. Changing the column structure requires full management permissions for the register.
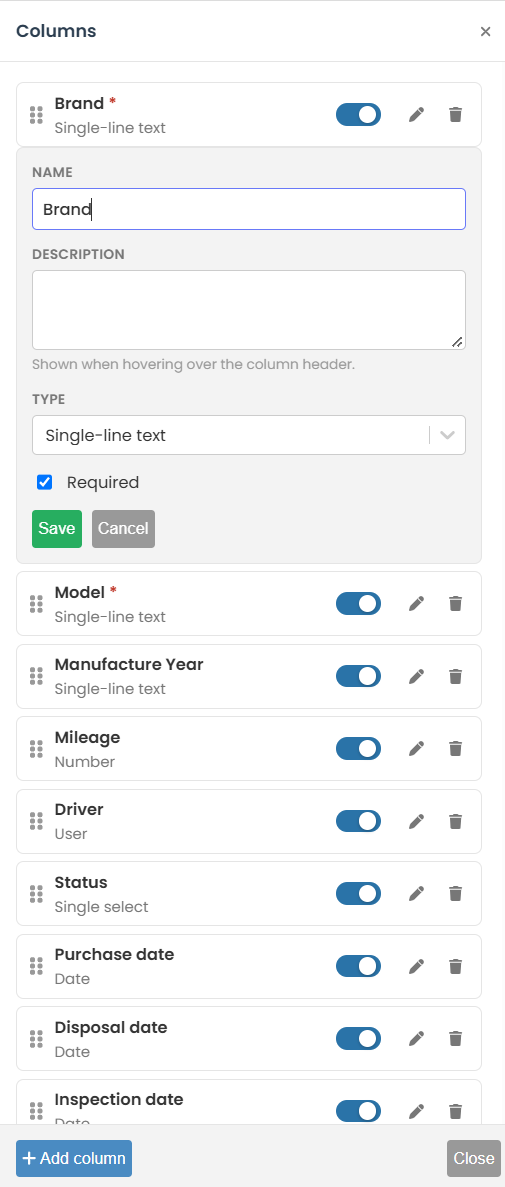
In the example, the Brand column is being edited. Its type is Single-line text, and Required is enabled.
Each column displays its name and type, along with controls for:
- changing its position by dragging the dotted handle on the left,
- showing or hiding it using the switch,
- editing its settings by clicking the pencil icon,
- deleting it by clicking the trash can icon.
To create a new column, click + Add column at the bottom of the panel.
Column settings
Clicking the pencil icon opens the edit form. It contains the following settings:
- Name - the text displayed in the column header.
- Description - additional information displayed when you hover over the column header.
- Type - the type of data stored in the column.
- Required - makes the column mandatory when completing an entry.
A register can contain the following column types:
| Type | Example use |
|---|---|
| Single-line text | Brand, Model, or Manufacture Year, as configured in the example. |
| Multiline text | Text that can span multiple lines. |
| Number | Mileage. |
| Date | Purchase date, Disposal date, or Inspection date. |
| Single select | Vehicle status, e.g. Up for sale, In use, or Sold. |
| Multi select | Vehicle insurance, e.g. third-party liability and comprehensive insurance. |
| Yes / No | Whether the vehicle has an LNG system. |
| User | The driver assigned to the vehicle. |
| Action Plan | Create an action plan linked to an entry and view its number and status directly in the register, e.g. a vehicle sale plan. |
The Number type also provides the following fields:
- Decimal places - the number of digits after the decimal separator.
- Unit - e.g. km, kg, %, or $USD.
To save changes to the column settings, click Save.
Column menu
Additional options are available in the … context menu in the column header.
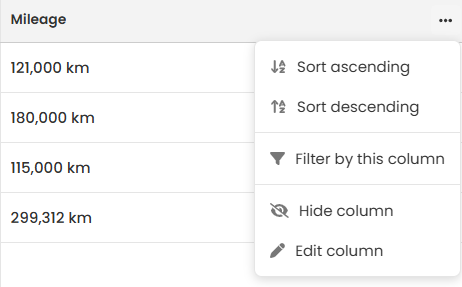
The menu contains the following options:
- Sort ascending - sort entries in ascending order by the values in the column.
- Sort descending - sort entries in descending order by the values in the column.
- Filter by this column - filter entries by the selected column.
- Hide column - hide the column from the table.
- Edit column - open the column settings.
To display a hidden column again, open the Columns panel and turn on the switch next to its name.
Additional register options
The … menu in the upper-right corner of the register view contains History, Settings, and Shortcuts. The example shown also includes Reset all to v1 (4).
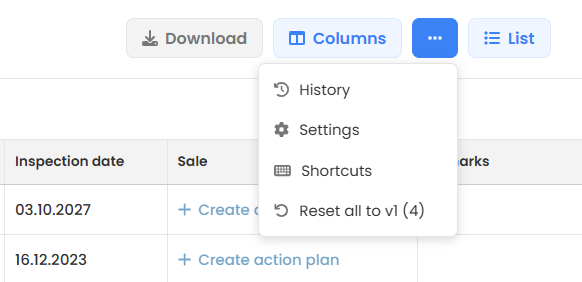
To configure the register, select Settings.
Change history
The change history allows you to check who created, updated, or deleted an entry, when the operation took place, and which data it affected. You can view the history for the entire register or for a selected entry.
Register change history
To open the history, expand the … menu in the upper-right corner of the register view and select History.
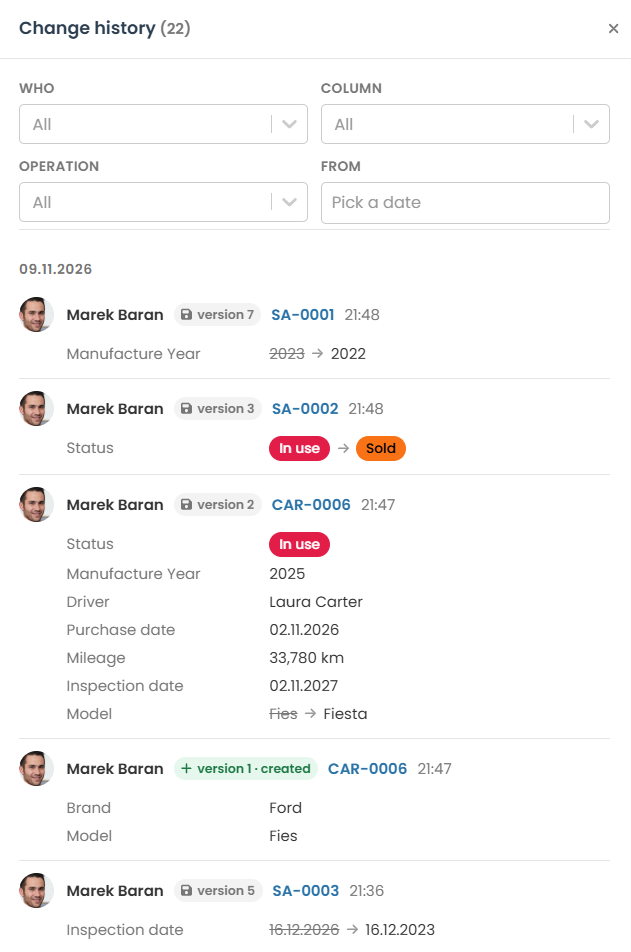
Filtering the history
The filters at the top of the window allow you to narrow down the events displayed:
- Who - select the user who performed the operation.
- Column - select the column affected by the operation.
- Operation - select the operation type: creation, update, or deletion.
- From - select the date from which events should be displayed.
Selecting All in a dropdown means that results are not restricted by that criterion.
Reviewing changes
Events are grouped by date, with the most recent first. Each operation displays the user, entry version number, entry number, and time of the operation. The column names and saved values appear below.
When data is changed, the previous value is crossed out and the new value appears after an arrow. In the example, Manufacture Year for SA-0001 changes from 2023 to 2022, and Status for SA-0002 changes from In use to Sold. The creation of CAR-0006 is marked with a green version 1 · created label.
Change history for a selected entry
You can also view the history by opening a specific entry. This view displays only operations affecting that entry.
To open an entry:
- Find it in the register table, e.g. CAR-0006.
- Expand the … menu next to its number.
- Select Open entry.
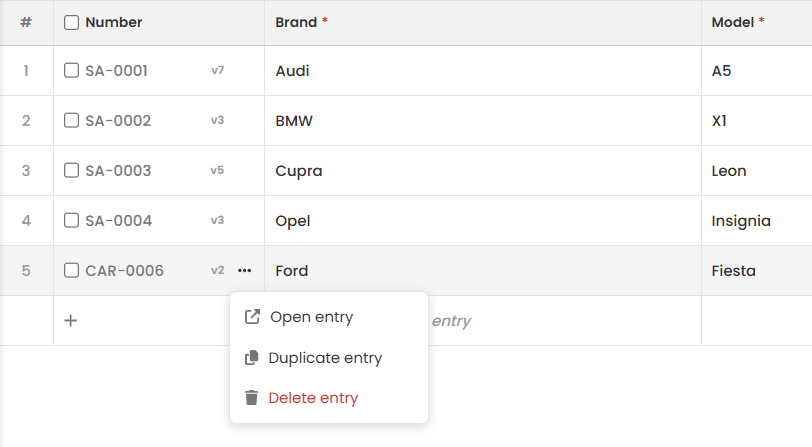
After opening the entry, go to the Change history section.
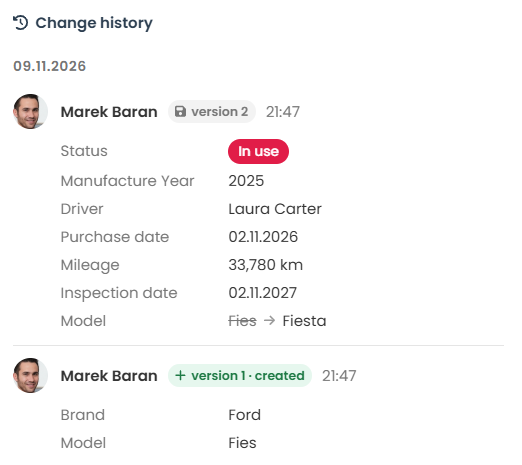
Events are grouped by date. Each operation displays the user, entry version, and time of the operation, followed by the column names and saved values.
In the example shown, the history of entry CAR-0006 on 09.11.2026 includes:
- version 1 at 21:47 - creation of the entry with Brand set to Ford and Model set to Fies.
- version 2 at 21:47 - changing Model from Fies to Fiesta and saving additional values, including Status: In use, Manufacture Year: 2025, Driver: Laura Carter, and Mileage: 33,780 km.
⚠️ Resetting entry versions to v1 deletes their previous change history.
Register settings
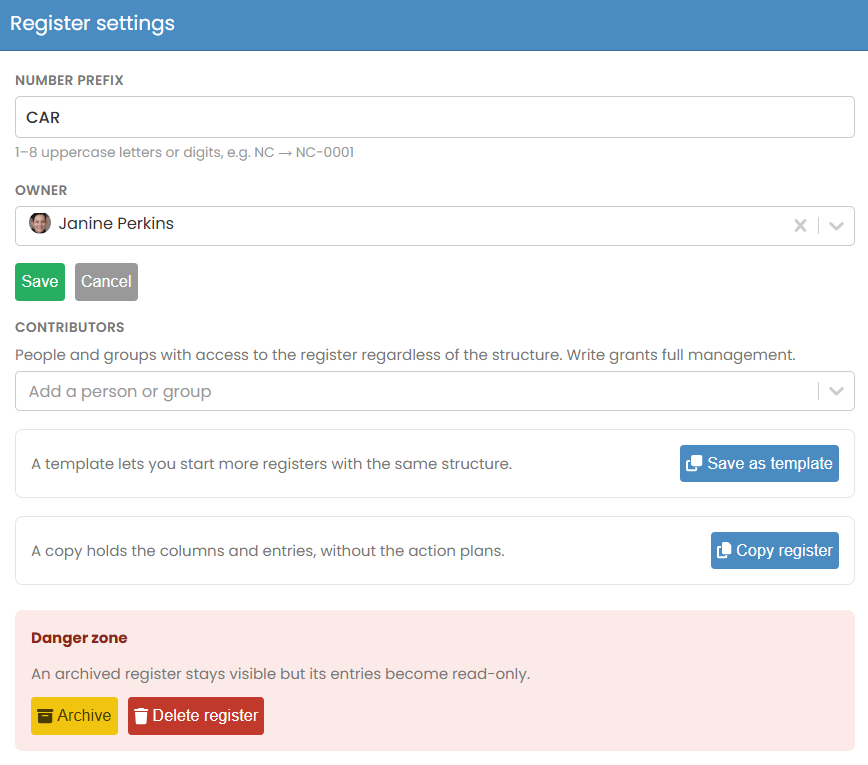
The Register settings window allows you to change the number prefix and owner, add contributors, save a template, copy the register, and archive or delete it. Access to settings requires full management permissions for the register; being assigned as the register owner alone does not grant this permission.
Number prefix and owner
The Number prefix and Owner fields are at the top of the window. In the example, the prefix is CAR and the owner is Janine Perkins. The prefix must contain 1 to 8 uppercase letters or digits. After making changes, click Save. Click Cancel to discard your changes.
Contributors
The Contributors section allows you to add participants to a specific register: users or groups with access regardless of the organizational structure. To add a participant, use the Add a person or group field.
- Read allows users to view the register and its entries.
- Write grants full management permissions for the register, including its settings, columns, and participants, as well as the ability to delete the register and reset entry versions to v1.
⚠️ Participation in a register is separate from the Participant role, which alone does not grant access to registers.
Saving a template
To reuse the structure when creating further registers, click Save as template. Saved templates are available on the Register templates tab.
Copying a register
The Copy register button allows you to create a copy of an existing register.
💡 The copy includes columns and entries, but not linked action plans.
Archiving and deleting
The Danger zone at the bottom of the window contains the following buttons:
- Archive - archive the register. An archived register remains visible, but its entries are read-only.
- Delete register - delete the register.
⚠️ If the register needs to remain available for viewing, archive it.
Register templates
Templates allow you to create further registers based on a saved structure. To display the available templates, select Register templates in the left menu bar of the Registers module.
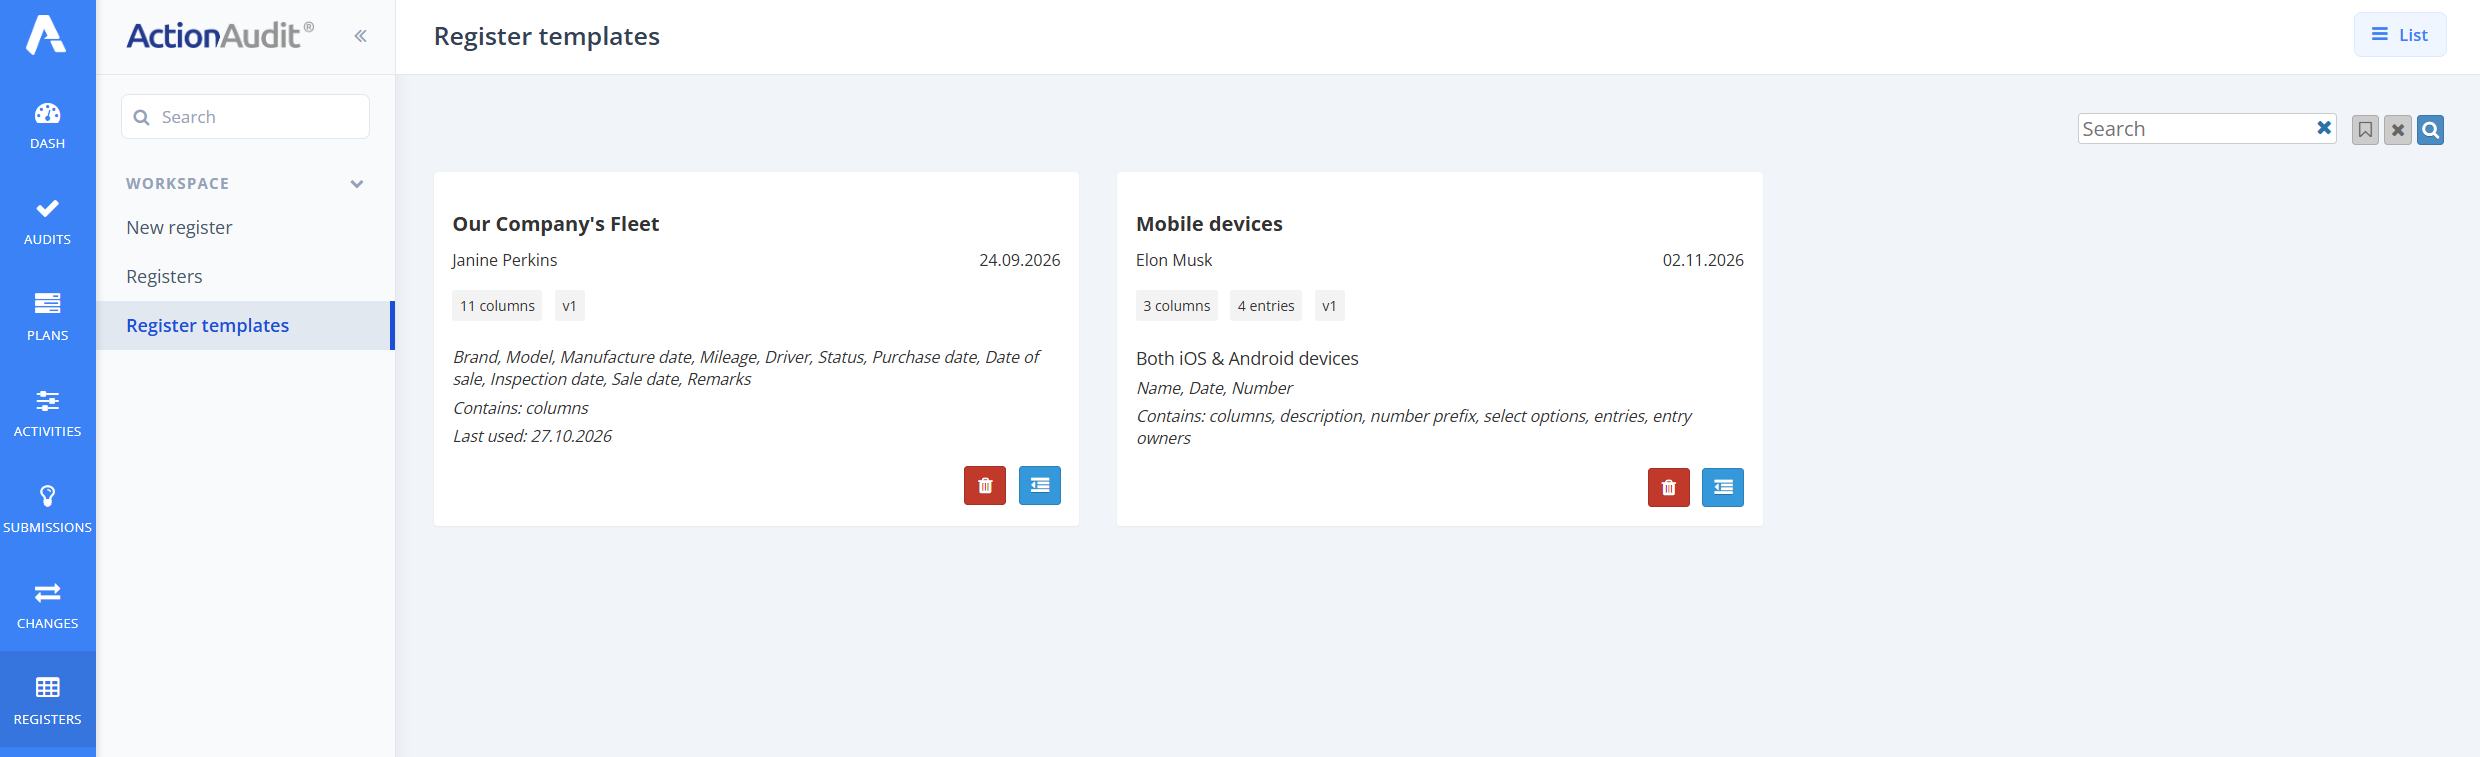
Each template is displayed as a card. The card shows its name, author, date, number of columns, version, and information about its contents. Depending on what was saved, it may also show a description, the number of entries, and the date the template was last used.
The Includes information specifies which elements are saved in the template. Depending on the template, these may include columns, the description, number prefix, choice list options, entries, and entry owners.
The Search field at the top of the view allows you to search for templates. The trash can icon on a card deletes the selected template, and the List button returns you to the registers list.
To create a register from a template:
- Open the New register form.
- Select the saved template in the Template field.
- Fill in the new register’s details.
- Click Create register.