Performing audits
Audit checklists ready for use by auditors are generated by the system according to the specified schedule. To view a specific audit, use the left menu bar, under the Audits tab in the Audits List section, as described in the previous chapter. After selecting the appropriate audit, the following page will appear:
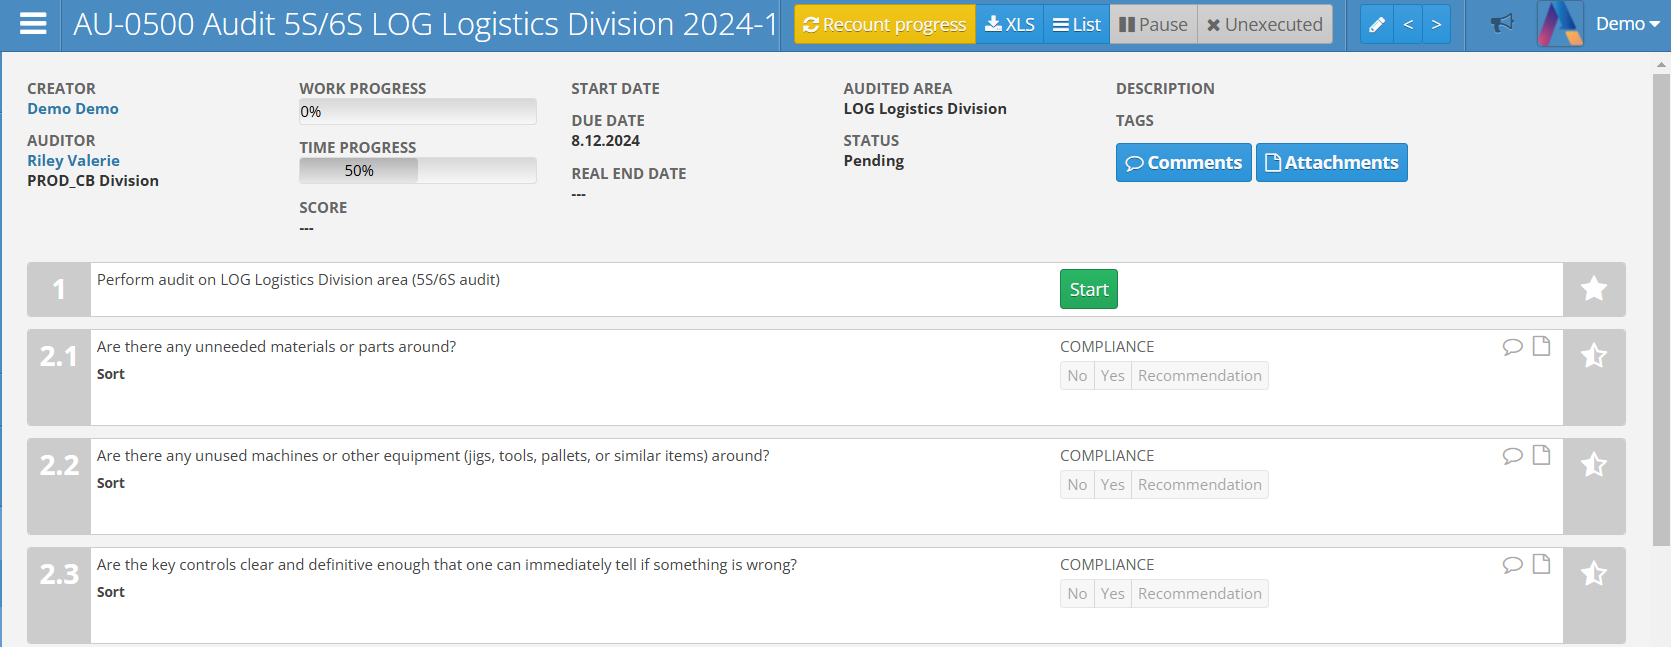
From top to bottom, the audit page includes the following elements:
- Audit number and name - a unique audit number and its name, indicating its association with a specific audit area
- Recount Progress - a button that allows recalculating the progress indicator based on the answers to the audit questions
- XLS - a button for exporting audit information to an XLS file
- PDF - (optional) a button for exporting audit information to a PDF file, available only for completed audits
- List - a button to return to the list of audits
- Unexecuted - a button that allows you to change the audit status to unexecuted. You can select unexecution Reasons
- Pause - a button that allows you to pause the audit until it is resumed. This means that notifications reminding about the audit will not be sent, the possibility of editing it will be limited and it will not be displayed on some boards and reports
- Pencil button - a button to edit the audit
- Arrow buttons - buttons for navigating between audits
- Megaphone button - a button to preview announcements
The panel below contains the following elements:
- Creator - the name of the user who initiated the audit
- Auditor - the name of the auditor assigned to perform the audit and their place in organizational structure
- Work progress - a percentage indicator of progress in answering the audit questions
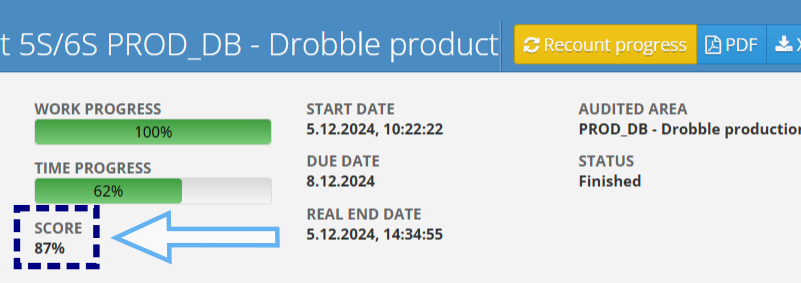
- Time progress - a percentage indicator showing the amount of time between the audit’s initiation date and its planned completion date. After the audit process ends, the indicator is frozen.
- Score - audit score
- Start date - the date and time when the audit was started
- Due date - the planned completion date of the audit. Failing to complete the audit by this date will mark it as delayed.
- Real end date - the date and time when the audit was completed
- Audited Area - the area to which the audit activity is assigned
- Status - information about the current status of the audit. Possible values include: pending, finished, executed, unexecuted
- Description - (optional) additional information about the audit
- Tags - (optional) keywords and labels for the audit
- Comments - (optional) the ability to add comments to the audit
- Attachments - (optional) the ability to add attachments to the audit
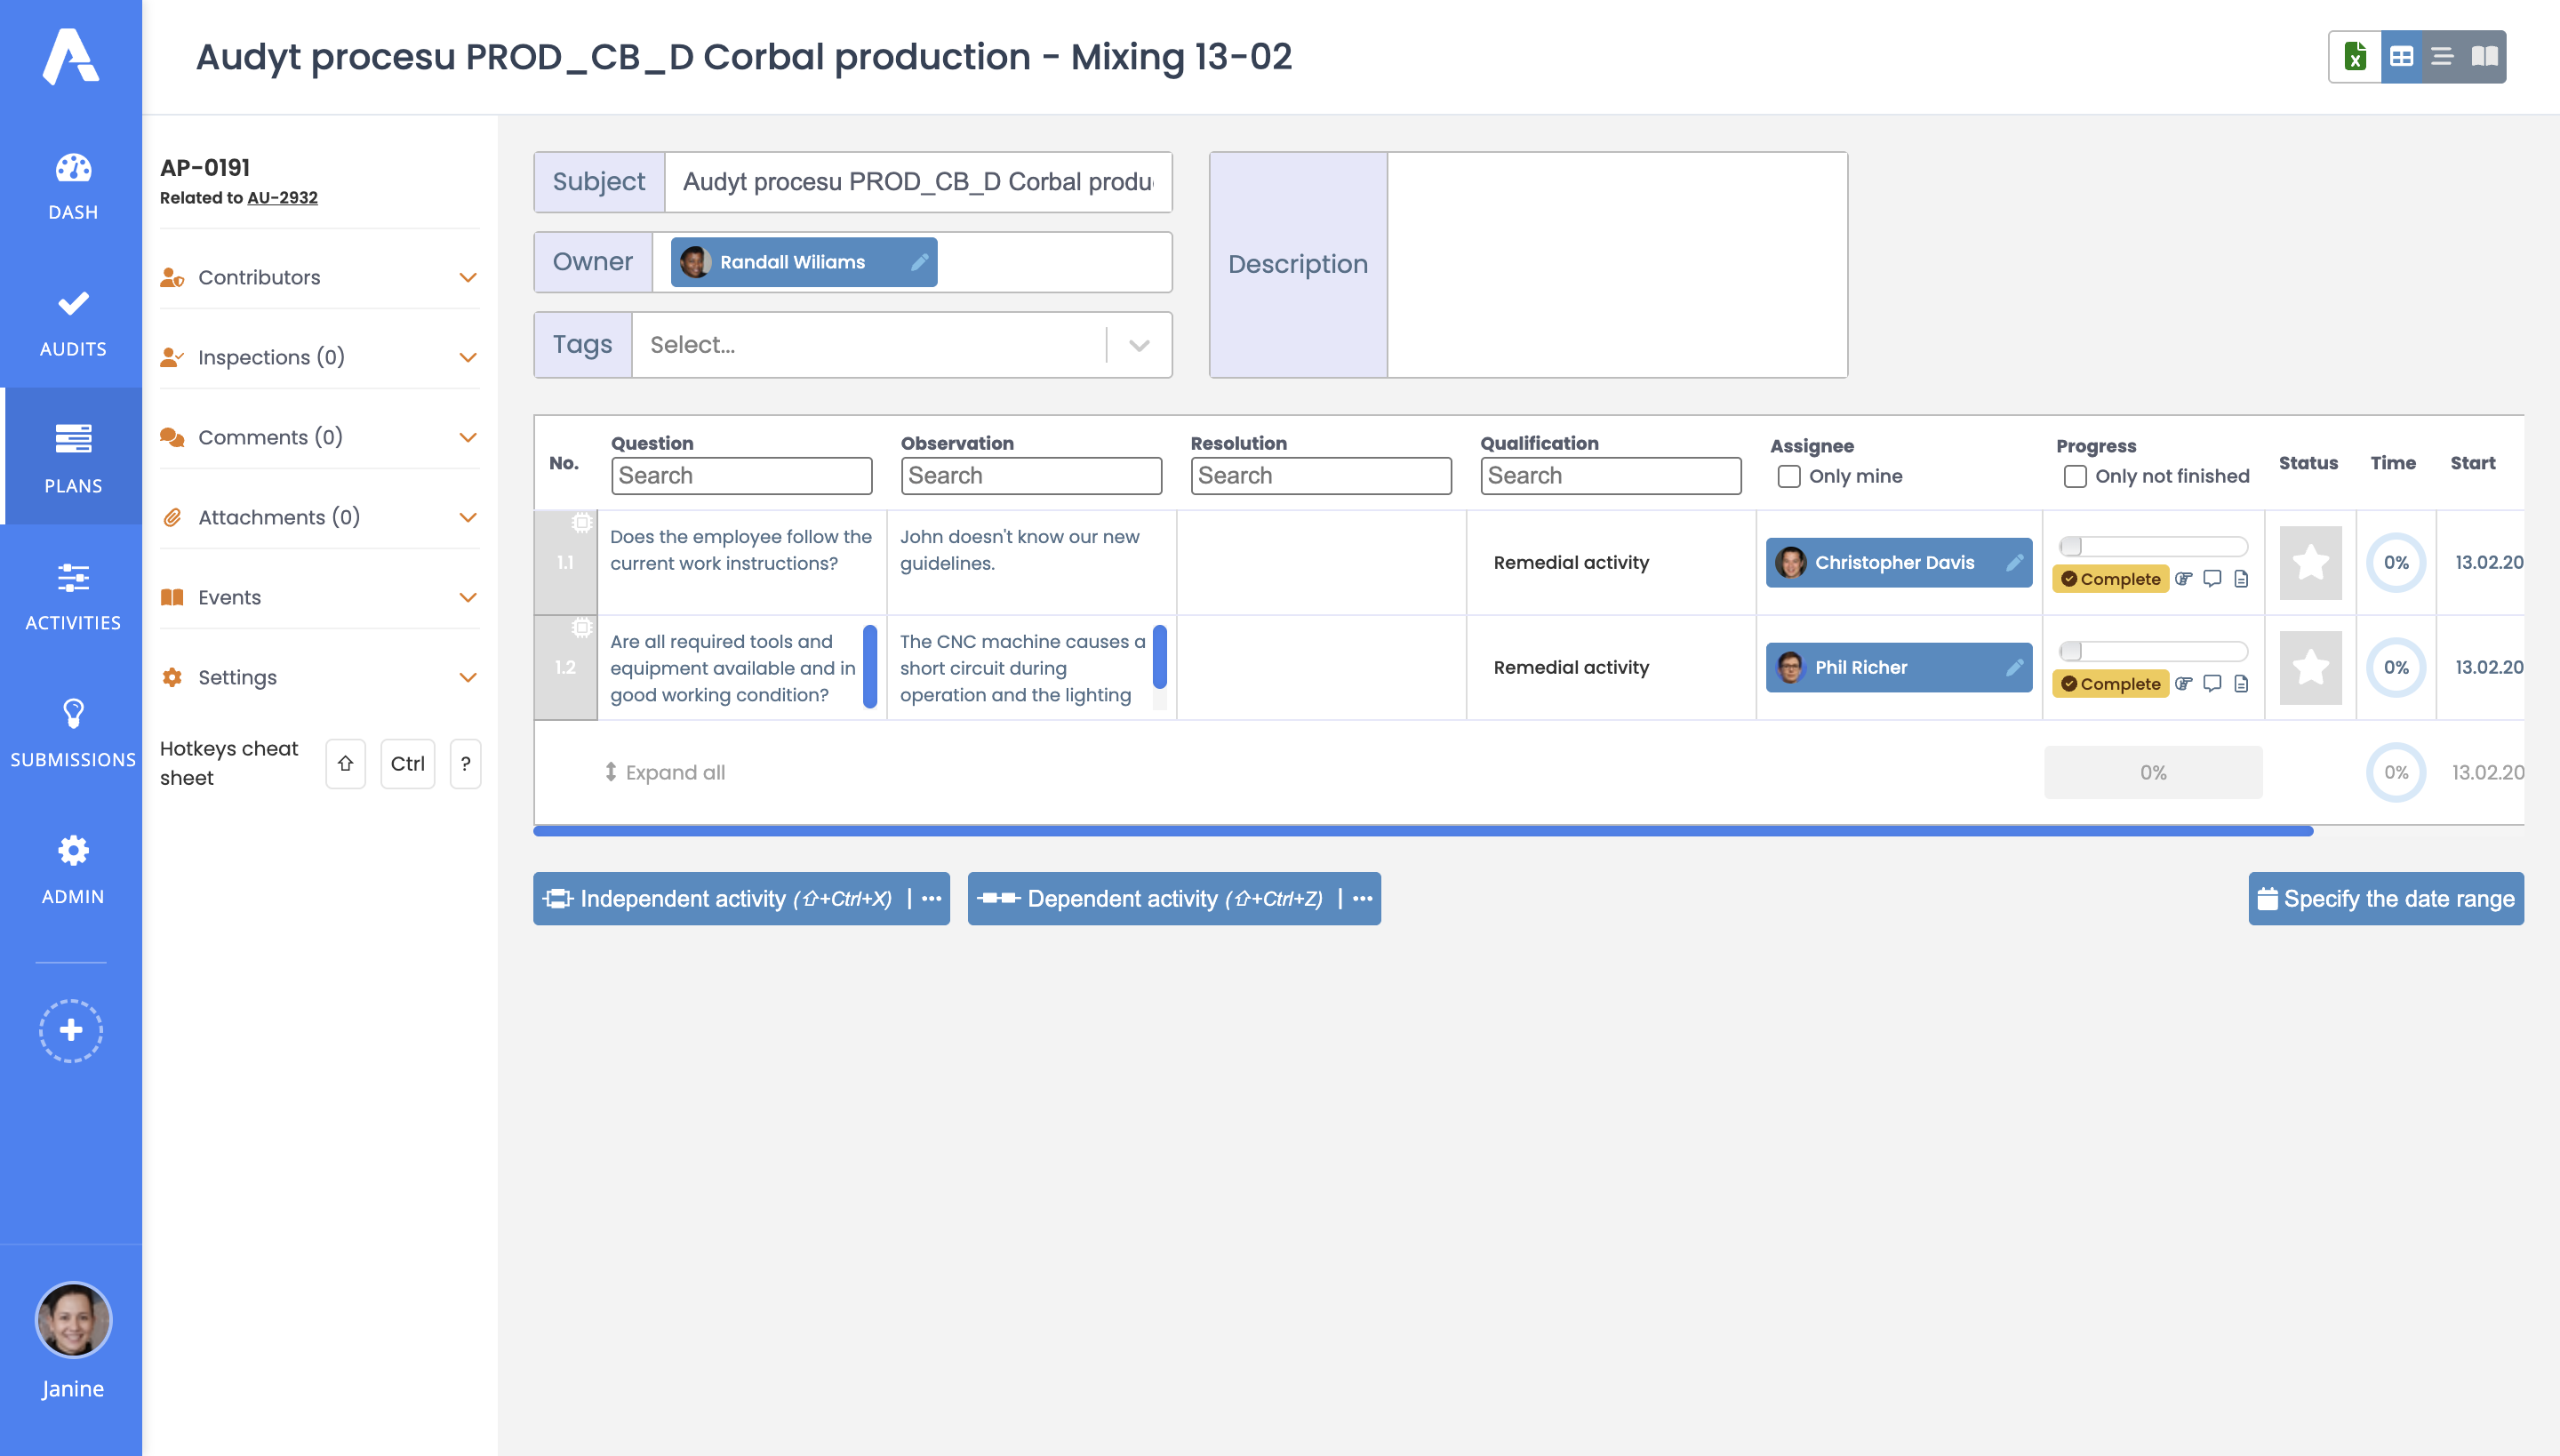
Audit questions
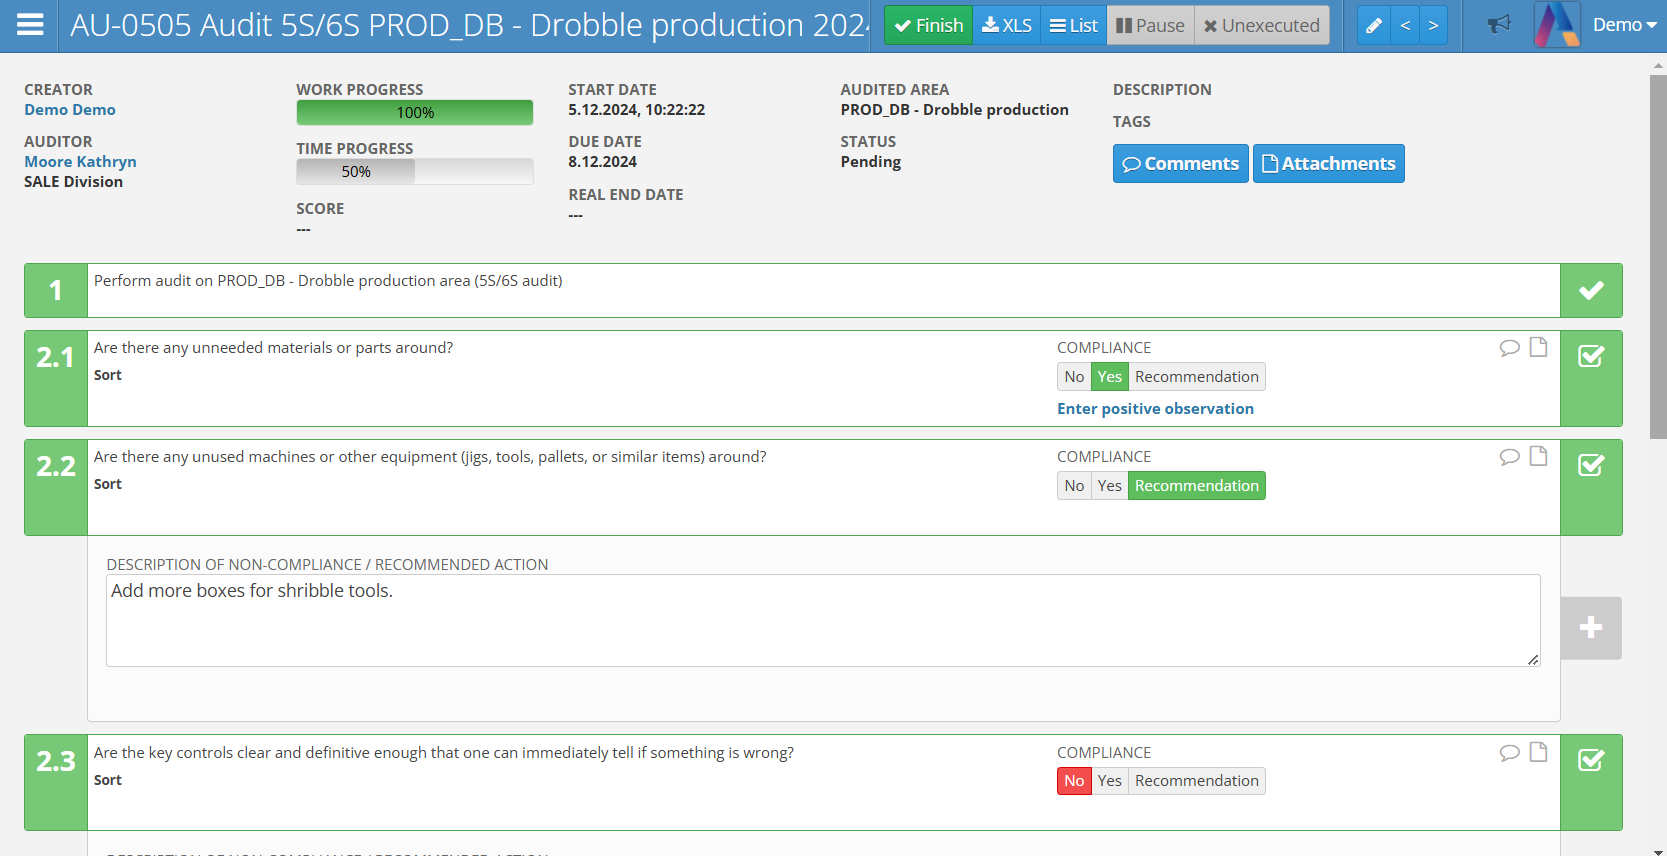
The displayed audit will show all the questions included in the checklist assigned to it. To begin auditing, click the green Start button. Then, answer the questions according to the defined scales and types of assessment.
For some answers, you may add a comment describing a non-compliance, positive observation, or a recommendation. To do this, select the appropriate option displayed next to the question, which will be suggested by the system.
Marking each question will turn it green as completed, even if the evaluation is negative. The number of positive and negative answers affects the audit score.
For each question, you can add and preview an attachment, a photo, a document or additional comment. This allows the auditor to thoroughly describe and visualize their observations and ideas.
Concluding the audit
After answering all questions, a green Finish button will appear at the top of the page. Pressing this button finalizes the audit, adds it to the statistics, and generates an automatic correction action plan based on negative answers, proposed solutions, and recommendations.
Audit compliance
The system allows for a multi-level assessment of the audit result in the area by defining two percentage thresholds. The compliance indicator appears after the audit is completed. It informs about the percentage of audit questions that received a positive rating.
In the audit area settings, it is possible to set a compliance threshold that determines whether the audit meets the quality requirements.
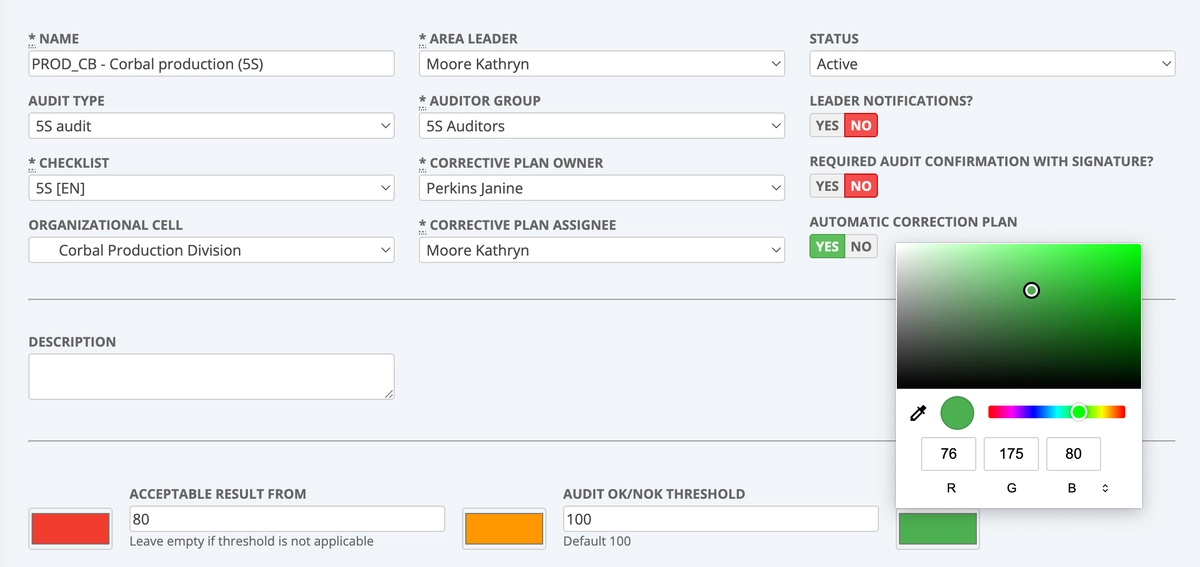
Acceptable result from – a percentage value defining the lower limit from which the audit is considered acceptable (an intermediate state between a negative and a fully positive result). If a three-point scale is not justified in a given area, this field should be left empty.
Positive result from – a percentage value defining the threshold from which the audit is considered completed with a fully positive (compliant) result. The default value is 100.
The user also has the option to assign a dedicated color to each status (by default: red for a negative result, orange for an acceptable result, and green for a positive result).
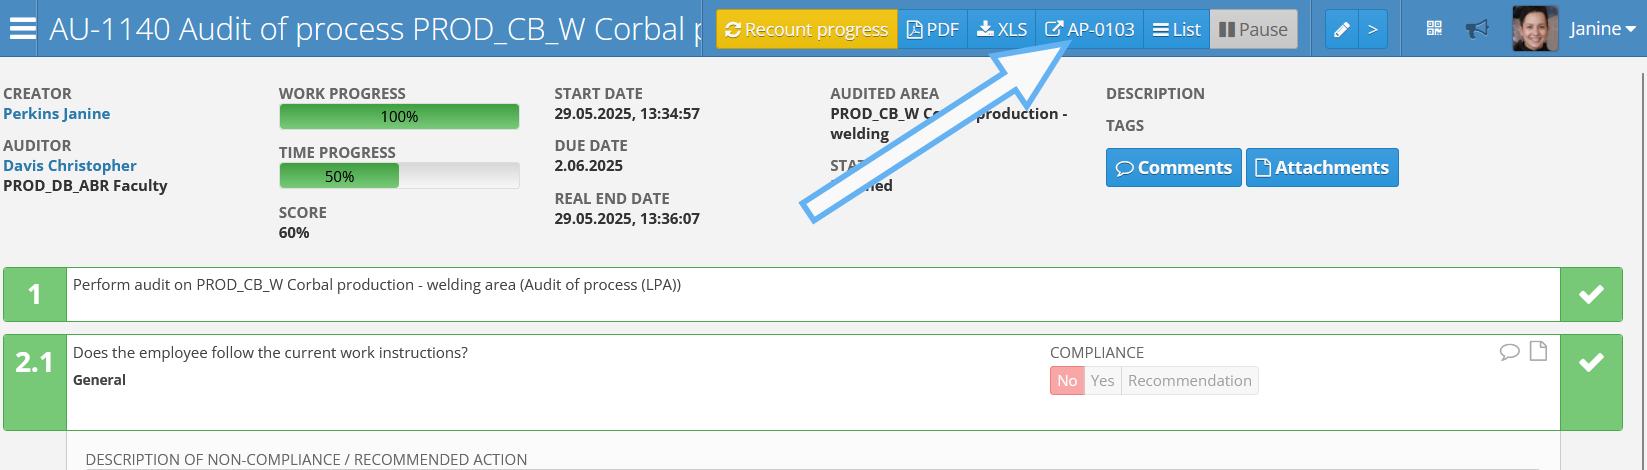
Automatic correction action plan
If nonconformities or recommendations are identified during the audit, pressing the green Finish button will automatically create a correction action plan. It will be available under the Action Plans tab in the left menu bar.
You can also access correction actions by clicking the plan number button in the top bar of the audit view:
Audit correction
If an audit has been completed but certain errors were found, it cannot be edited immediately. To fix incorrect answers to the questions, you must first delete the corrective action plan that was created after clicking the Finish button.
To do this, use the white function bar, go to the Settings tab, and select the Delete Action Plan option. Then, in the displayed panel, click the red Delete Action Plan button again. Once this is done, a green Rework button will appear at the top of the audit.
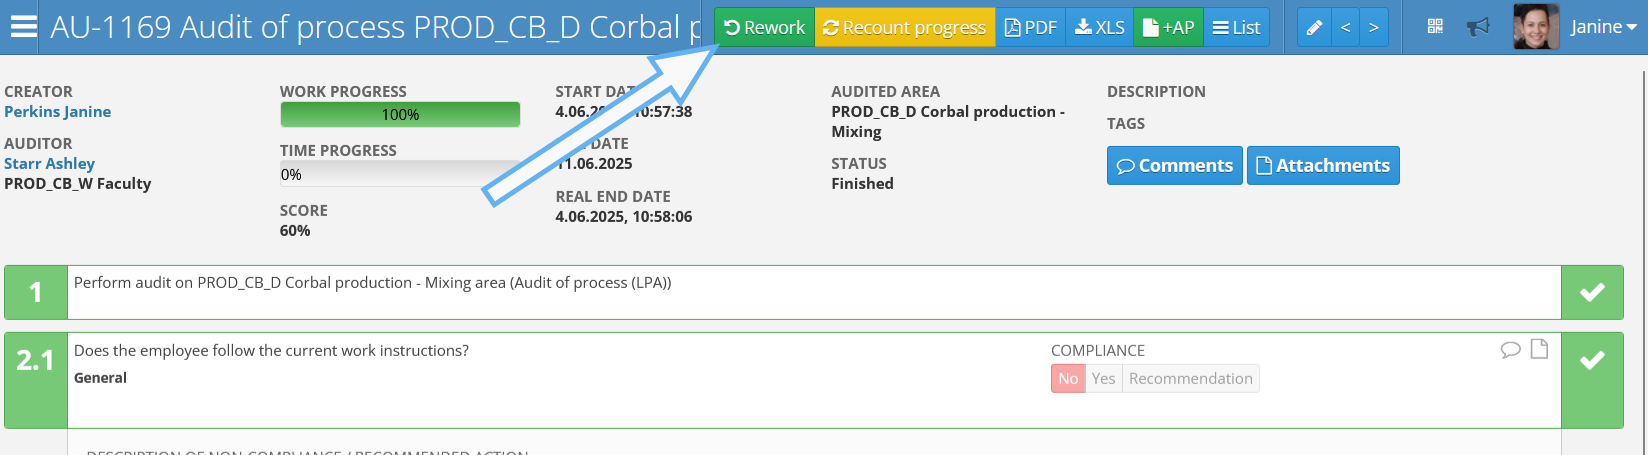
If all questions in the audit received positive answers, no corrective action plan was created. In this case, the Rework button will be visible immediately.
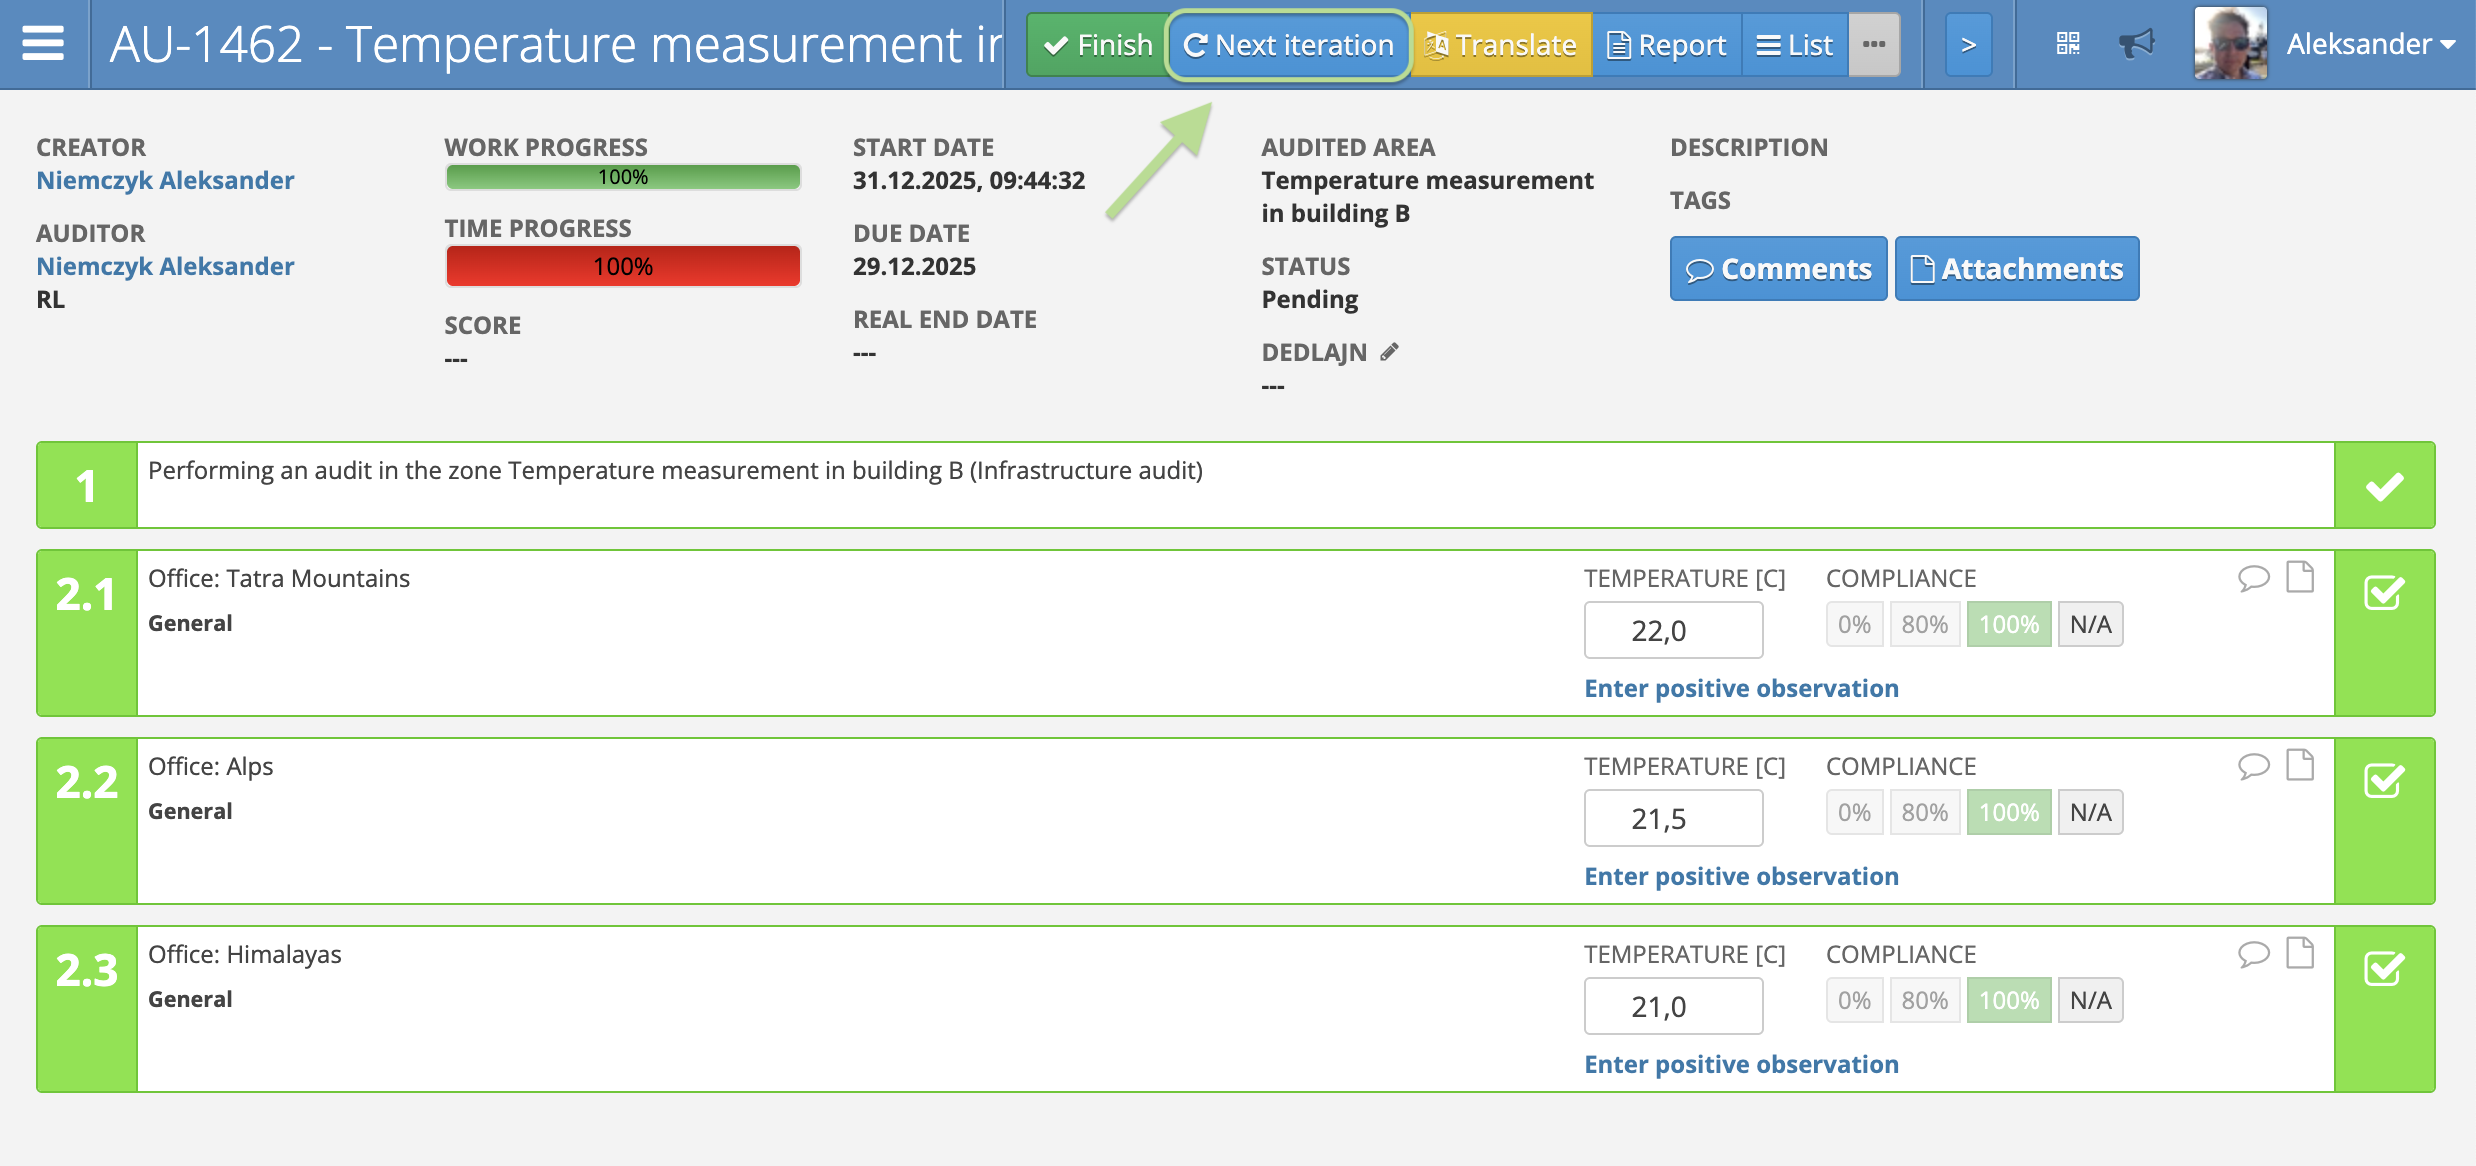
Next iteration
In audits based on a checklist with multiple iterations allowed, clicking the Next iteration button will add consecutive iteration to the audit.
Editing an existing audit
To edit an existing audit, click the pencil button next to its name. The edit panel allows access to settings such as name, description, auditor, start and end dates, removing specific questions, etc. To confirm changes, use the green Update button.