Users
User management is available in the left menu bar under the Administration section in the Users tab. Upon entering this view, a panel displaying all users in the system will appear.
User panel
To change the user display view, use the panel visible in the upper right corner of the screen:

The elements on the panel are described by the following numbers:
- XLS - button that provides the option to download the list of all users from the system in .xls format
- Active - active users of the system within the license limit
- Archived - list of archived users
- All - view showing all users
- New - new user creation form
The Status and Role parameters support a multifilter, allowing you to select and filter data by multiple values at once. This enables, for example, displaying users with different system roles at the same time.
Refreshing the E-mail Address
Clicking the refresh icon 🔄 next to a user’s e-mail expiry date resends instantly refreshes the address validity status.
Users can refresh their email address themselves starting from 1 month before its expiration date. There are two ways to do this:
- In the profile view: Go to your profile and click the “Verify email address” button (this will send a message containing a confirmation link).
- From reminder emails: Click directly on the links provided in system emails.
In both cases, the email validity will be extended for another 12 months.
User information
To view the details of a specific user, click on the button composed of their first and last name. The following graphic shows the user addition/edit form from the administrator’s perspective. Each user can also edit most of their account information by selecting the “My Account” option from the menu in the upper right corner.
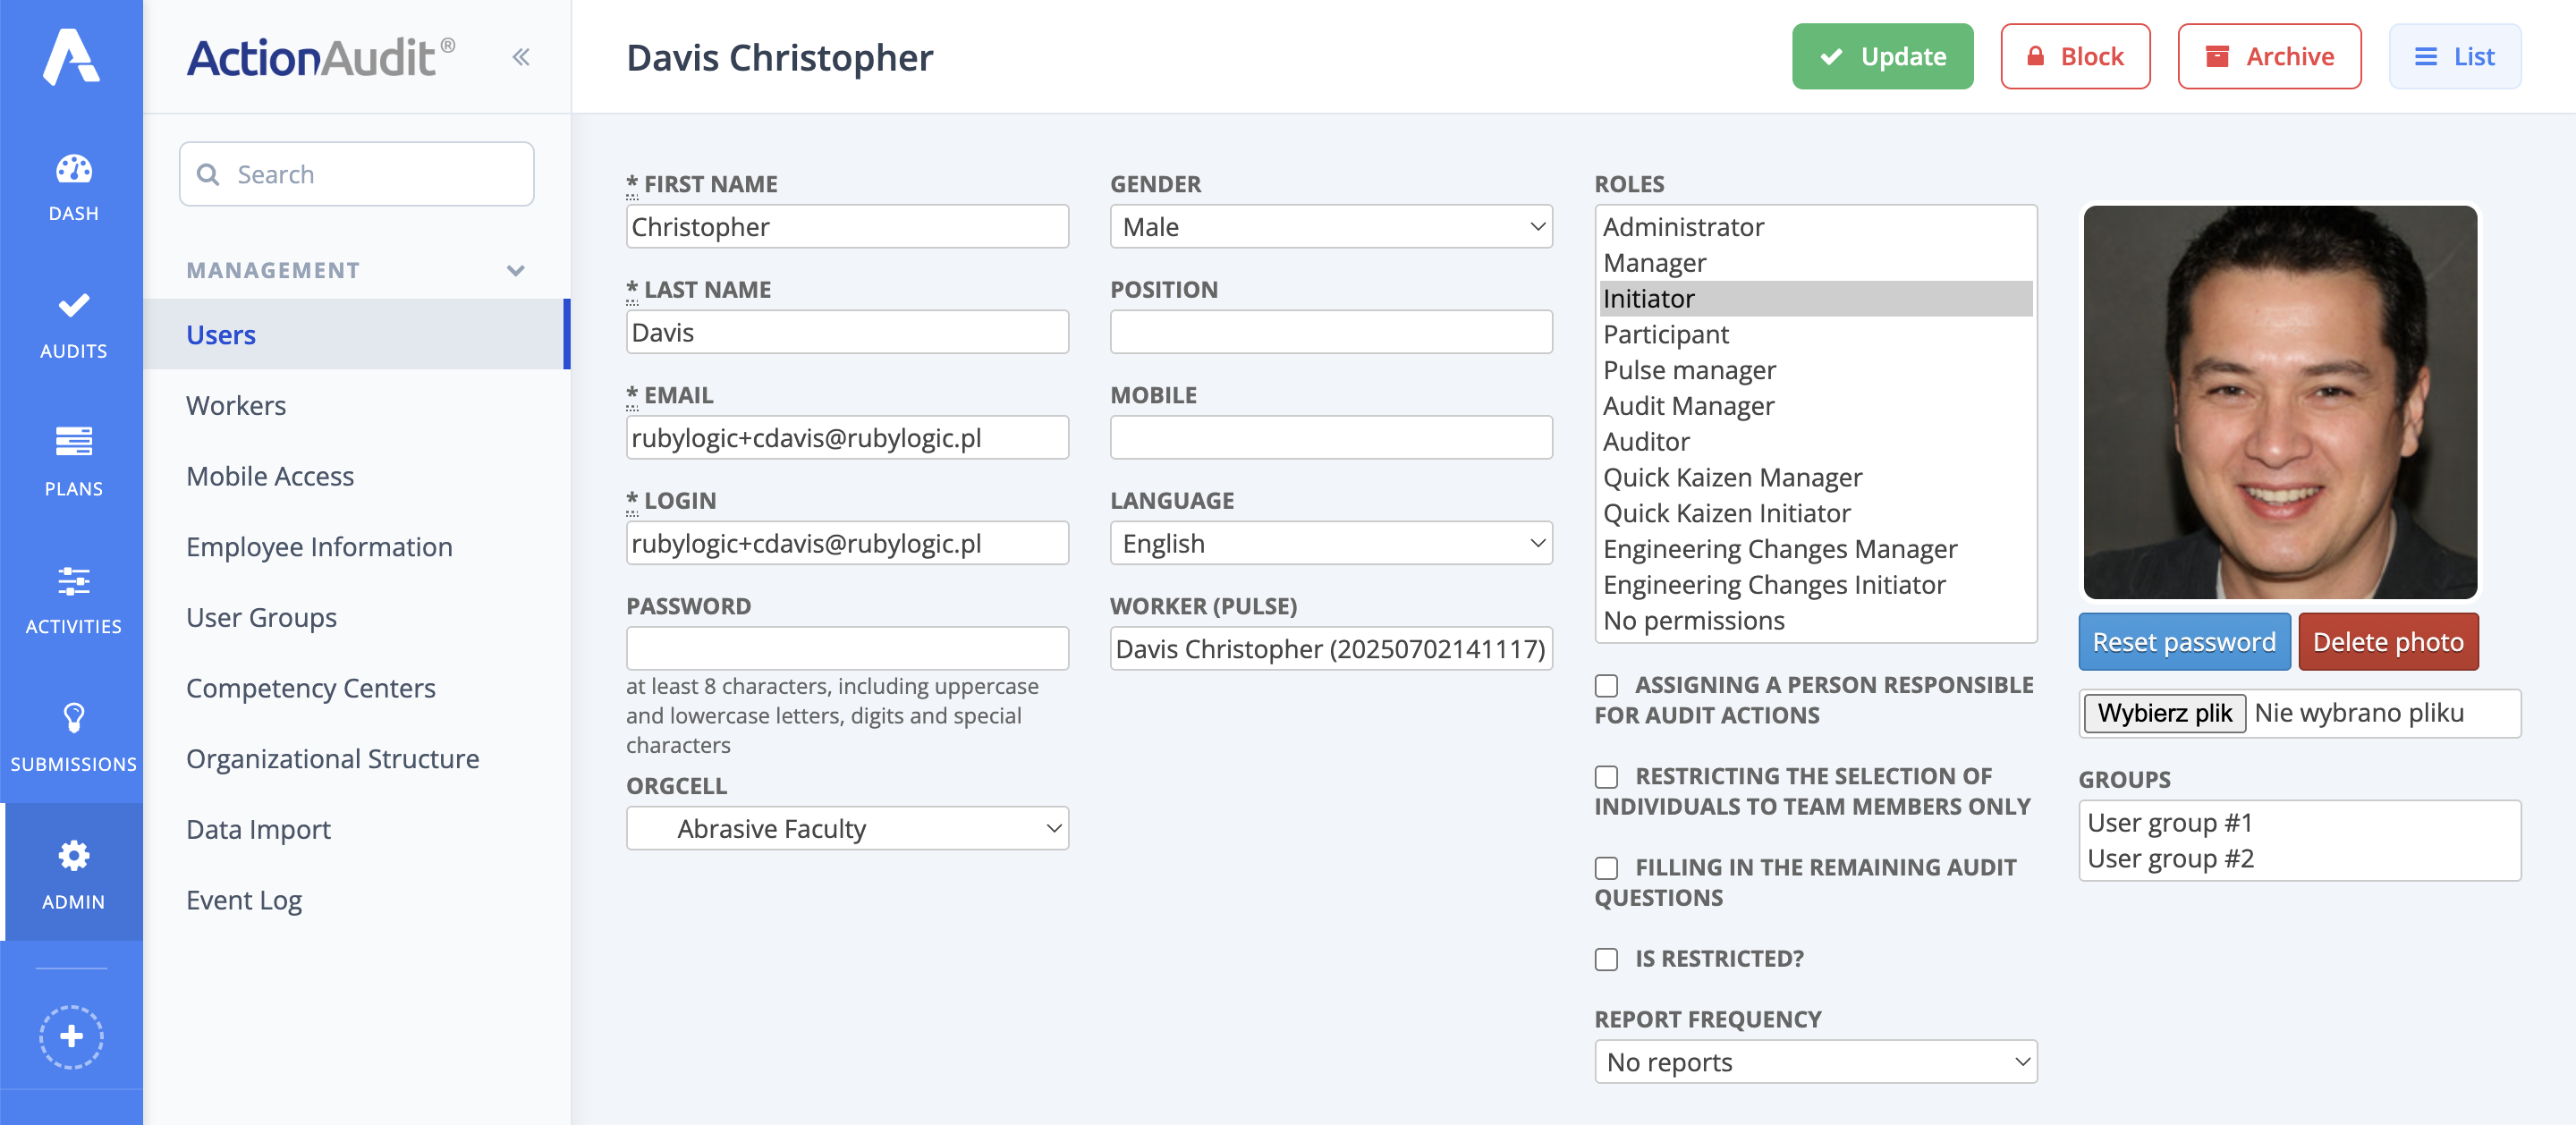
The form consists of the following fields:
-
First Name - the first name of the user to whom this account belongs
-
Last Name - the last name of the user to whom the account belongs
-
Email - the email address associated with the account. It must be unique throughout the system. Editing the email address requires administrator permissions
-
Login - the unique login of the user used to log into the system. Editing the login requires administrator permissions
-
Password - the user’s password
-
Orgcell - the organizational unit to which the user is assigned. It determines which cells the user’s permissions apply to. Changing the organizational cell requires administrator permissions
-
Gender - the user’s gender
-
Position - the job title the user holds in the company
-
Mobile - the user’s mobile phone number
-
Report frequency - specifies the type of daily report the user will receive each day at the email address associated with the account. Available options are No reports, Less frequent reports, and More frequent reports
-
Locale - the user’s preferred language. It affects the interface text, generated audits, and exported files
-
Worker (pulse) - the employee assigned to the user’s account. Assignment and editing require administrator permissions
-
Roles - the roles responsible for the user’s permissions. Changing roles requires administrator permissions
To assign multiple roles to a user, hold down the “CTRL” or “CMD” key and select the appropriate roles with the left mouse button.
-
Assigning a person responsible for audit actions – an additional permission that allows a user to assign a responsible person for the corrective plan in the mobile application. The Admin and Audit Manager roles have this option permanently enabled
-
Restricting the selection of individuals to team members only – in areas where a user selection option is available (e.g. when assigning responsibility for actions in plans), only non-restricted users from the user’s organizational cell and its subordinate cells will be displayed
-
Filling in the remaining audit questions – when a user is completing an audit and there are unanswered questions, they can assign the same value to all of them at once, without having to select each question individually
-
Is restricted? - enabling the reservation makes this user not appear in form auto-completion. This field is visible only to the administrator
-
Reset password - an option to reset the user’s password if it has been lost
-
Photo - the user’s photo. Allowed extensions are .jpg and .png
-
Groups - the user groups to which this user belongs
Adding a user
To add a new user to the system, click the green New button in the upper right corner of the screen. Then a panel will appear where you need to enter the appropriate information. To confirm the changes made, click the green Create button in the upper right corner of the screen.
Once a user is created, they will be automatically notified of the creation of a new account via email, which will also include their login details.
Note: To add a new user, the organization must have available slots within the license. If adding is not possible, you need to free up a slot or contact the system administrator to extend the license.
Adding a new user to replace another
When removing a user from the system and needing to add a new one in their place, it is possible to quickly and easily transfer all attributes from the old user to the new one. To do this, follow these steps:
- Go to the Administration tab, in the Users section
- Find the user you want to remove
- Click the red Archive button
- Choose whether you want to assign the attributes to an existing or a new user
- To assign attributes to an existing user, select the option “Reassign to existing user”
- To create a new user, select the option “Reassign to new user and fill out the form displayed below
- Confirm the changes
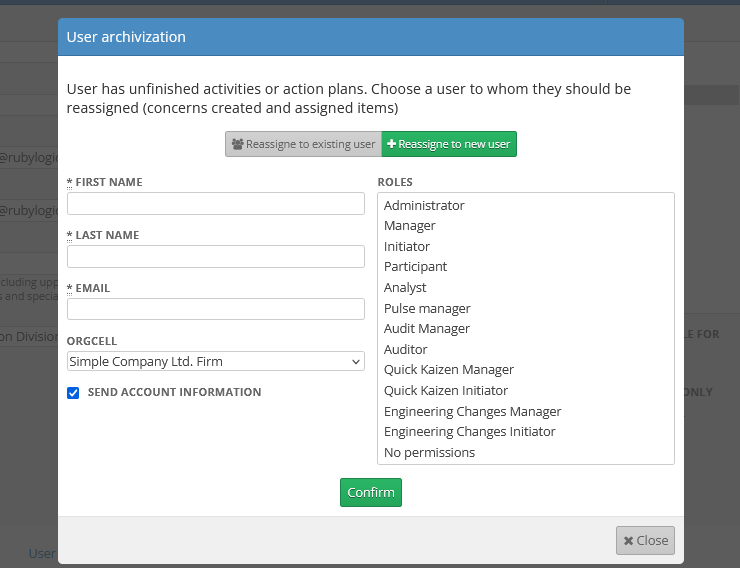
The above steps will ensure that assigned audits, activities, group memberships, and attributes such as being an audit area leader, responsible for an action plan, or individual activities will be transferred.
User removal
The organization cannot permanently delete a user from the system to avoid data loss that might result from such deletion. Instead, there is an Archive option, which makes the user no longer visible in the system while retaining their data in the database. Archiving a user means they will no longer count toward the license limit.
During the archiving process, it may turn out that the user has assigned elements, such as audits or action plans. In this case, you should:
- Go to the Administration tab, in the Users section
- Find the user you want to remove
- Click the red Archive button
- Transfer all attributes to an existing user by selecting the “Reassign to existing user” option
- Confirm the changes
The steps above will transfer assigned audits, activities, audit group membership, and attributes such as being an audit area leader, action plan owner, or person responsible for specific activities.
To completely remove a user from the system, please contact the application administrator at Ruby Logic.
Restoring an archived user
To restore an archived user, click the Restore button located in the upper-right corner of the user panel.