Registers
The Registers module in the Action Audit mobile app allows you to view and update data in tabular form. Individual rows are called entries, and the columns define the information stored. You can also search and filter entries, manage columns, and review the change history.
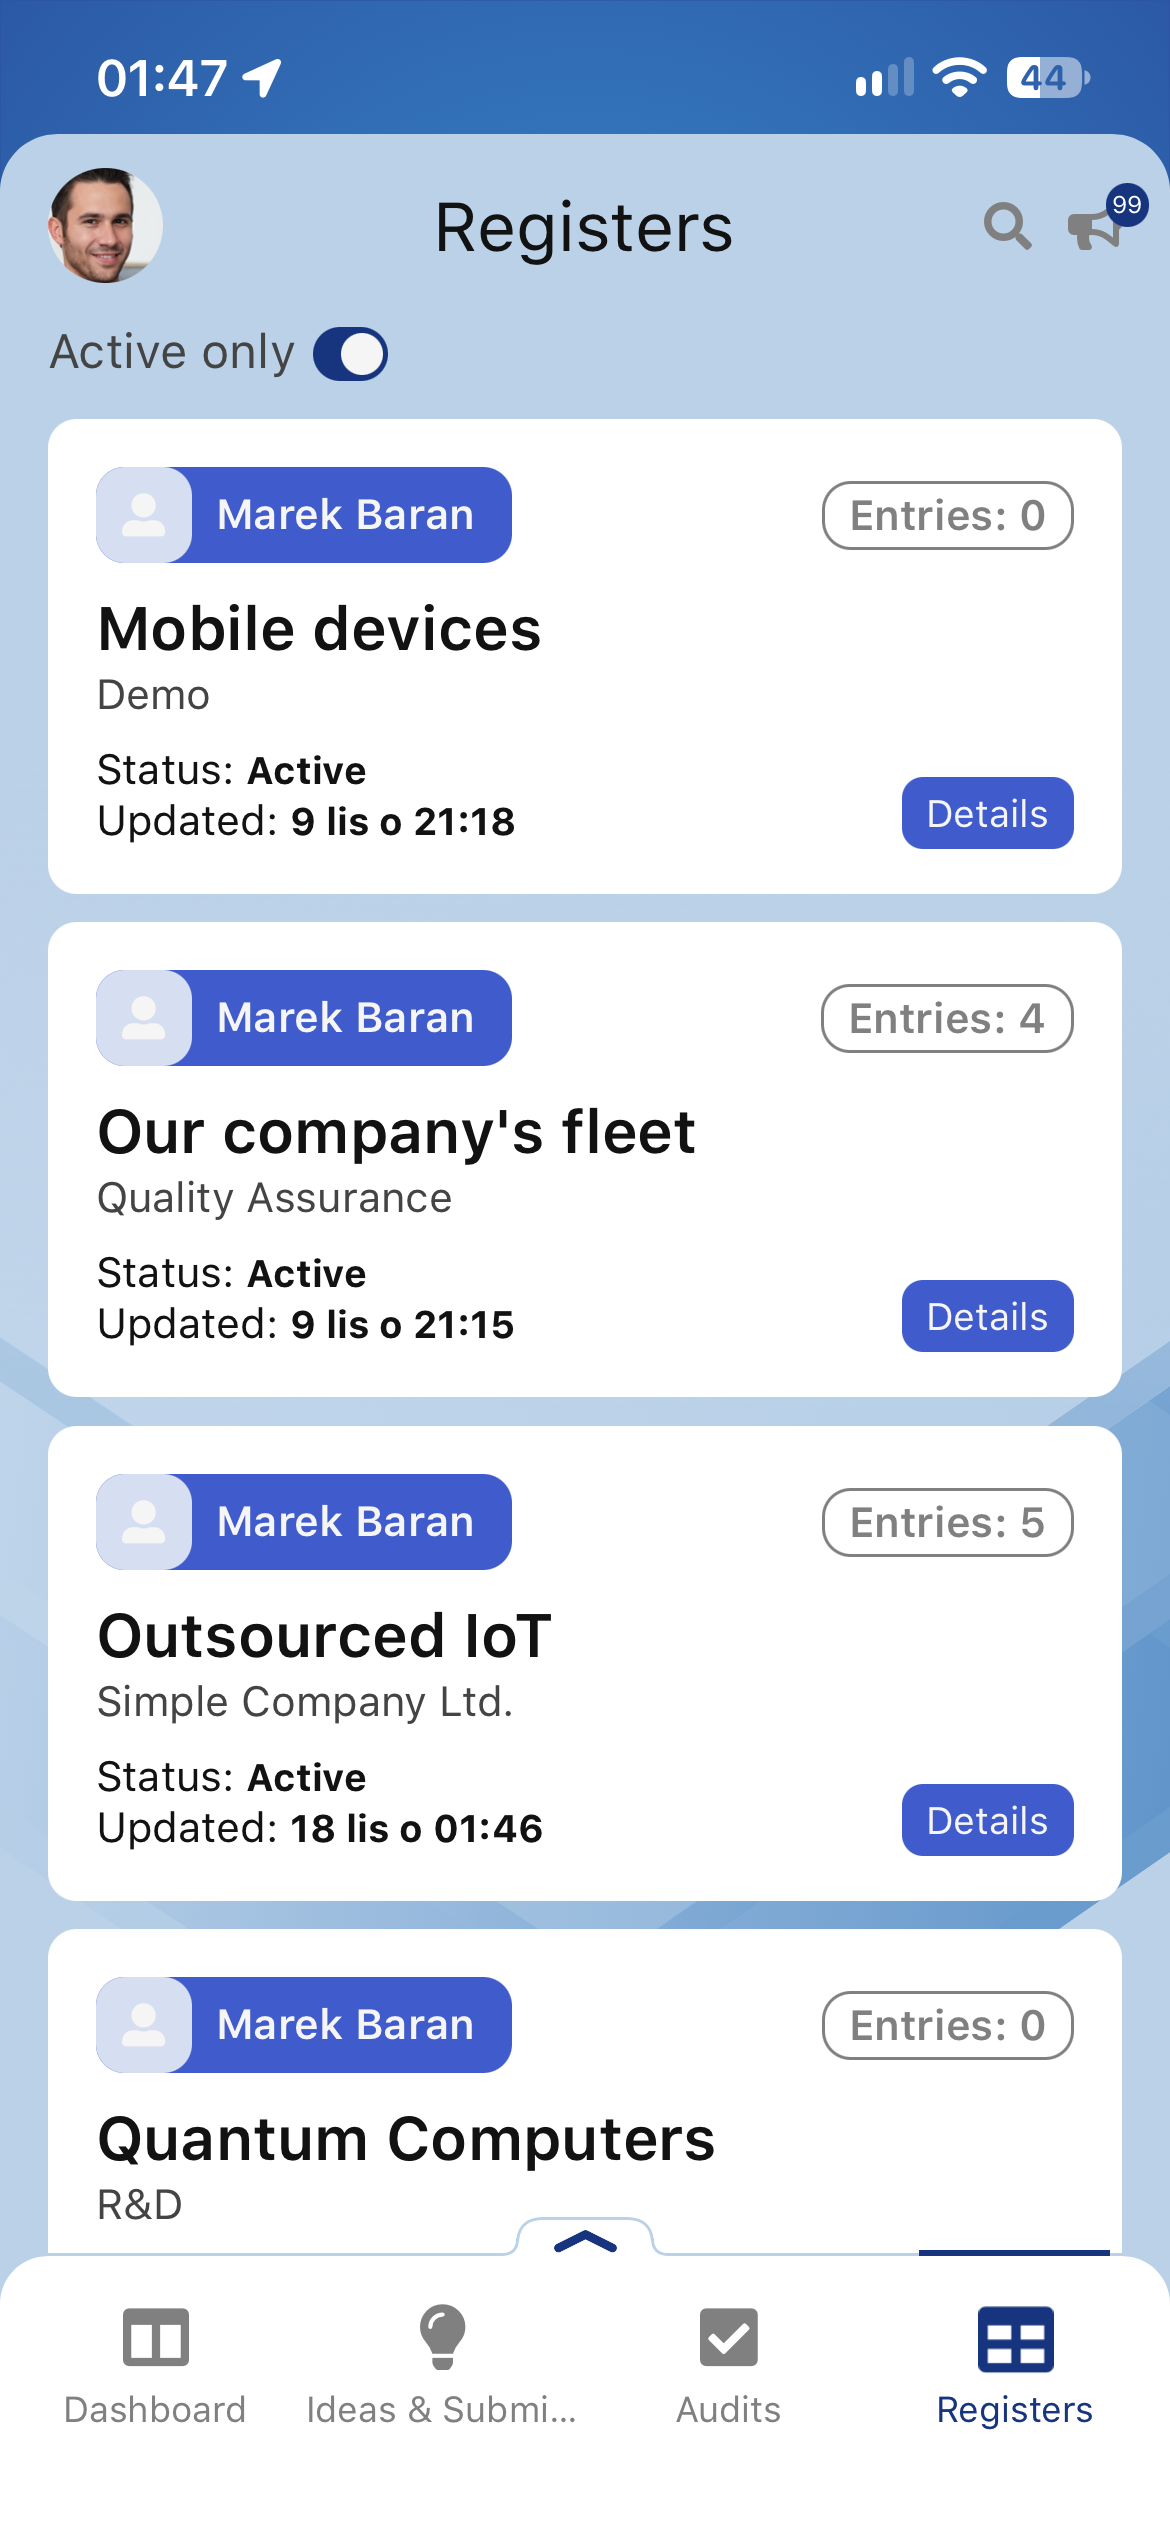
Access to registers
To open the module, select the Registers tab in the bottom navigation bar. Opening a register displays a table of its entries.
The data and operations available to you depend on your permissions. Access rules are described in Registers - User permissions.
An entry owner without broader permissions can view and edit only their own entries, but cannot add or delete entries. Changing the column structure and accessing register settings require full management permissions for the register.
Register view
The register name and the search, filter, and additional options icons appear at the top of the screen. The arrow in the upper-left corner returns you to the previous view.
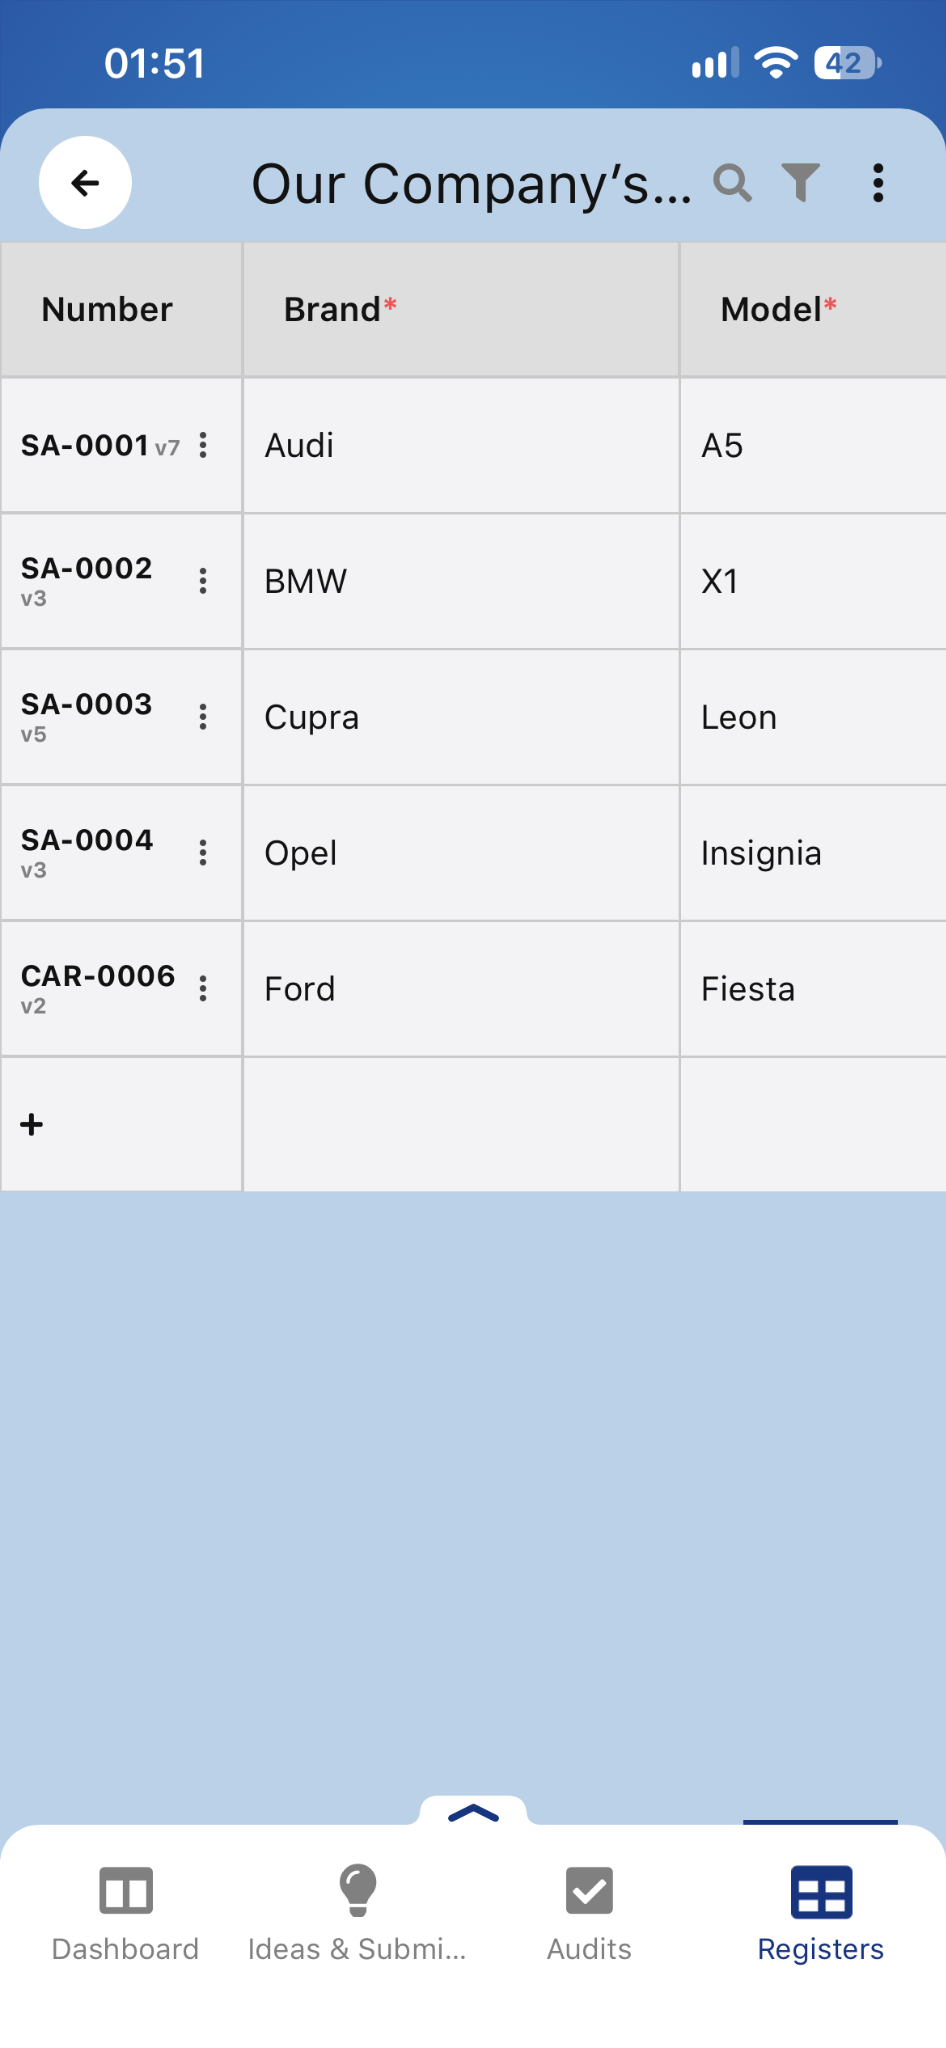
The table displays:
- Number - the entry identifier, e.g. SA-0001 or CAR-0006.
- Version - a label next to the entry number, e.g. v7, v3, v5, or v2.
- Register columns - fields containing data, e.g. Brand and Model.
- Entry menu - the three dots icon next to the entry number.
- + - a row for adding another entry.
A red asterisk next to a column name indicates a required field. In the screenshot, Brand and Model are required.
Scroll the table horizontally to view additional columns. The Number column lets you identify an entry while viewing fields further across the table.
Searching and filtering entries
Searching
To search for entries, tap the magnifying glass icon at the top of the screen. The register name is replaced by the Search entries… field, where you can enter the text to search for.
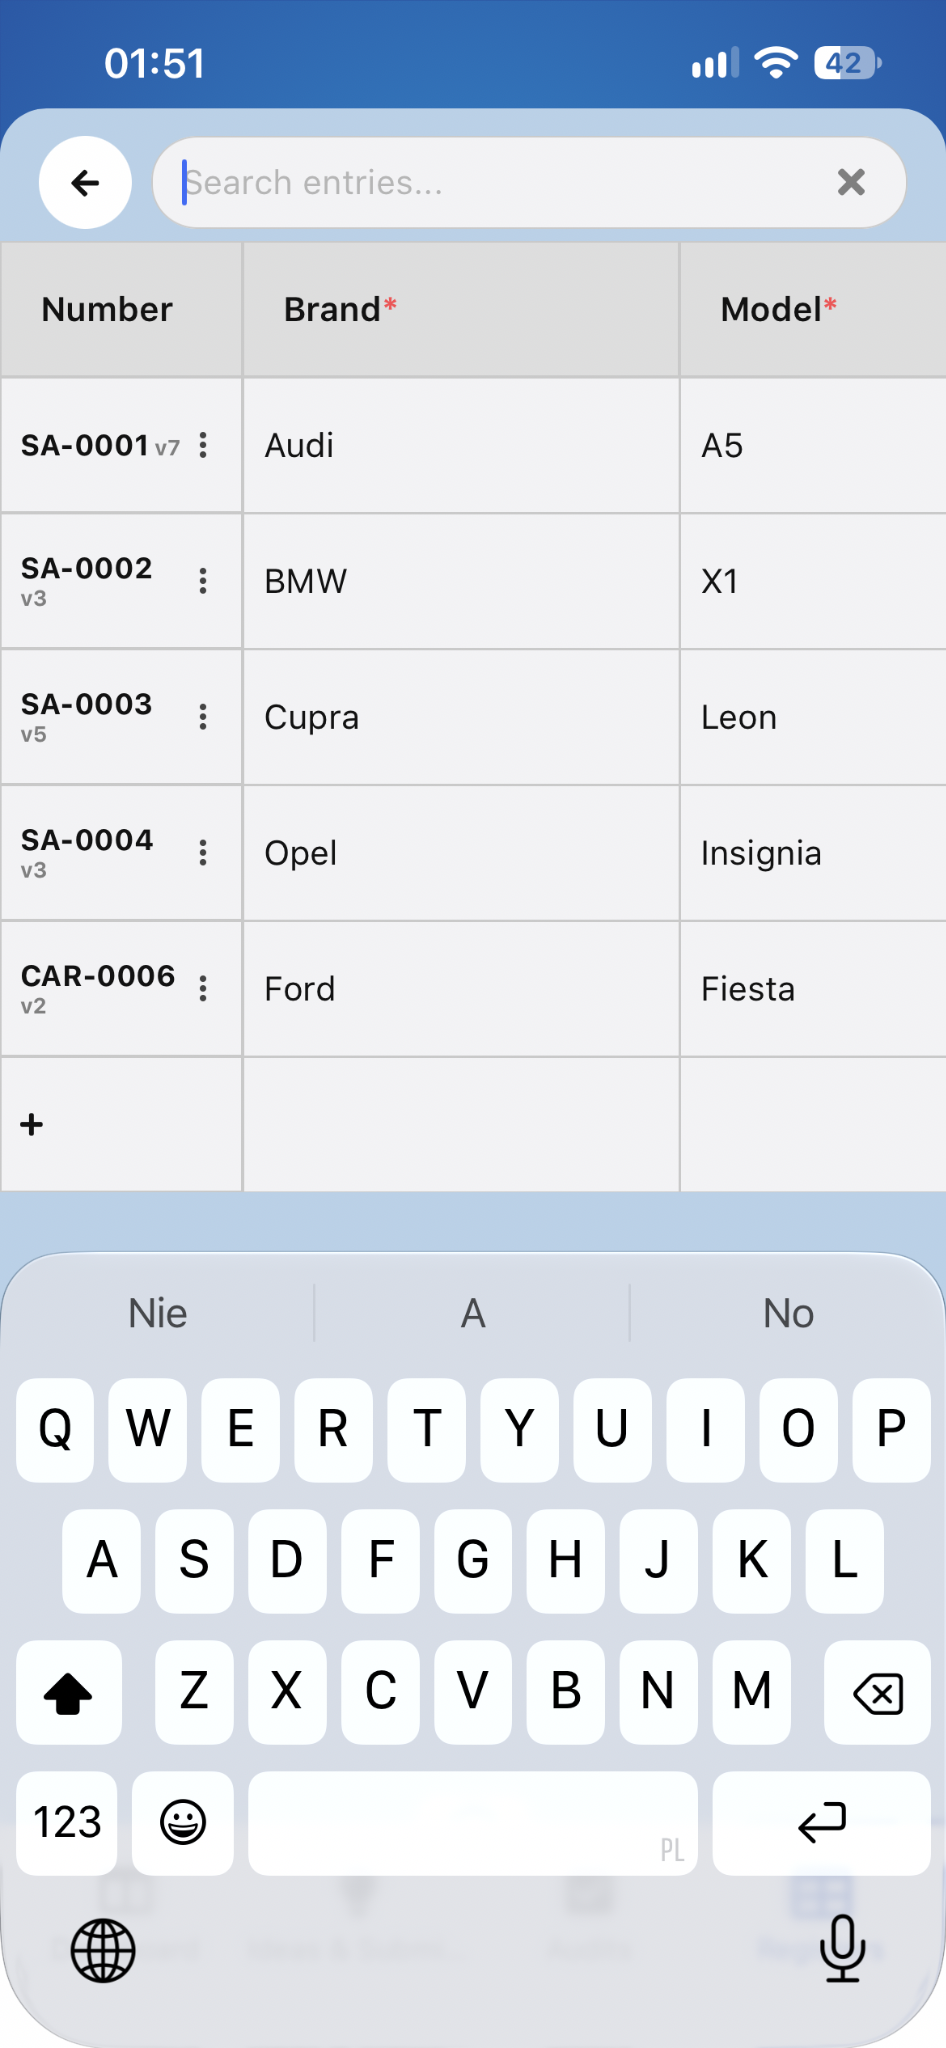
Filtering
The funnel icon opens the Entry filters window. Each condition has three elements:
- Column - the field used to filter entries.
- Operator - the comparison method, e.g. Contains.
- Value - the text or value used in the condition.
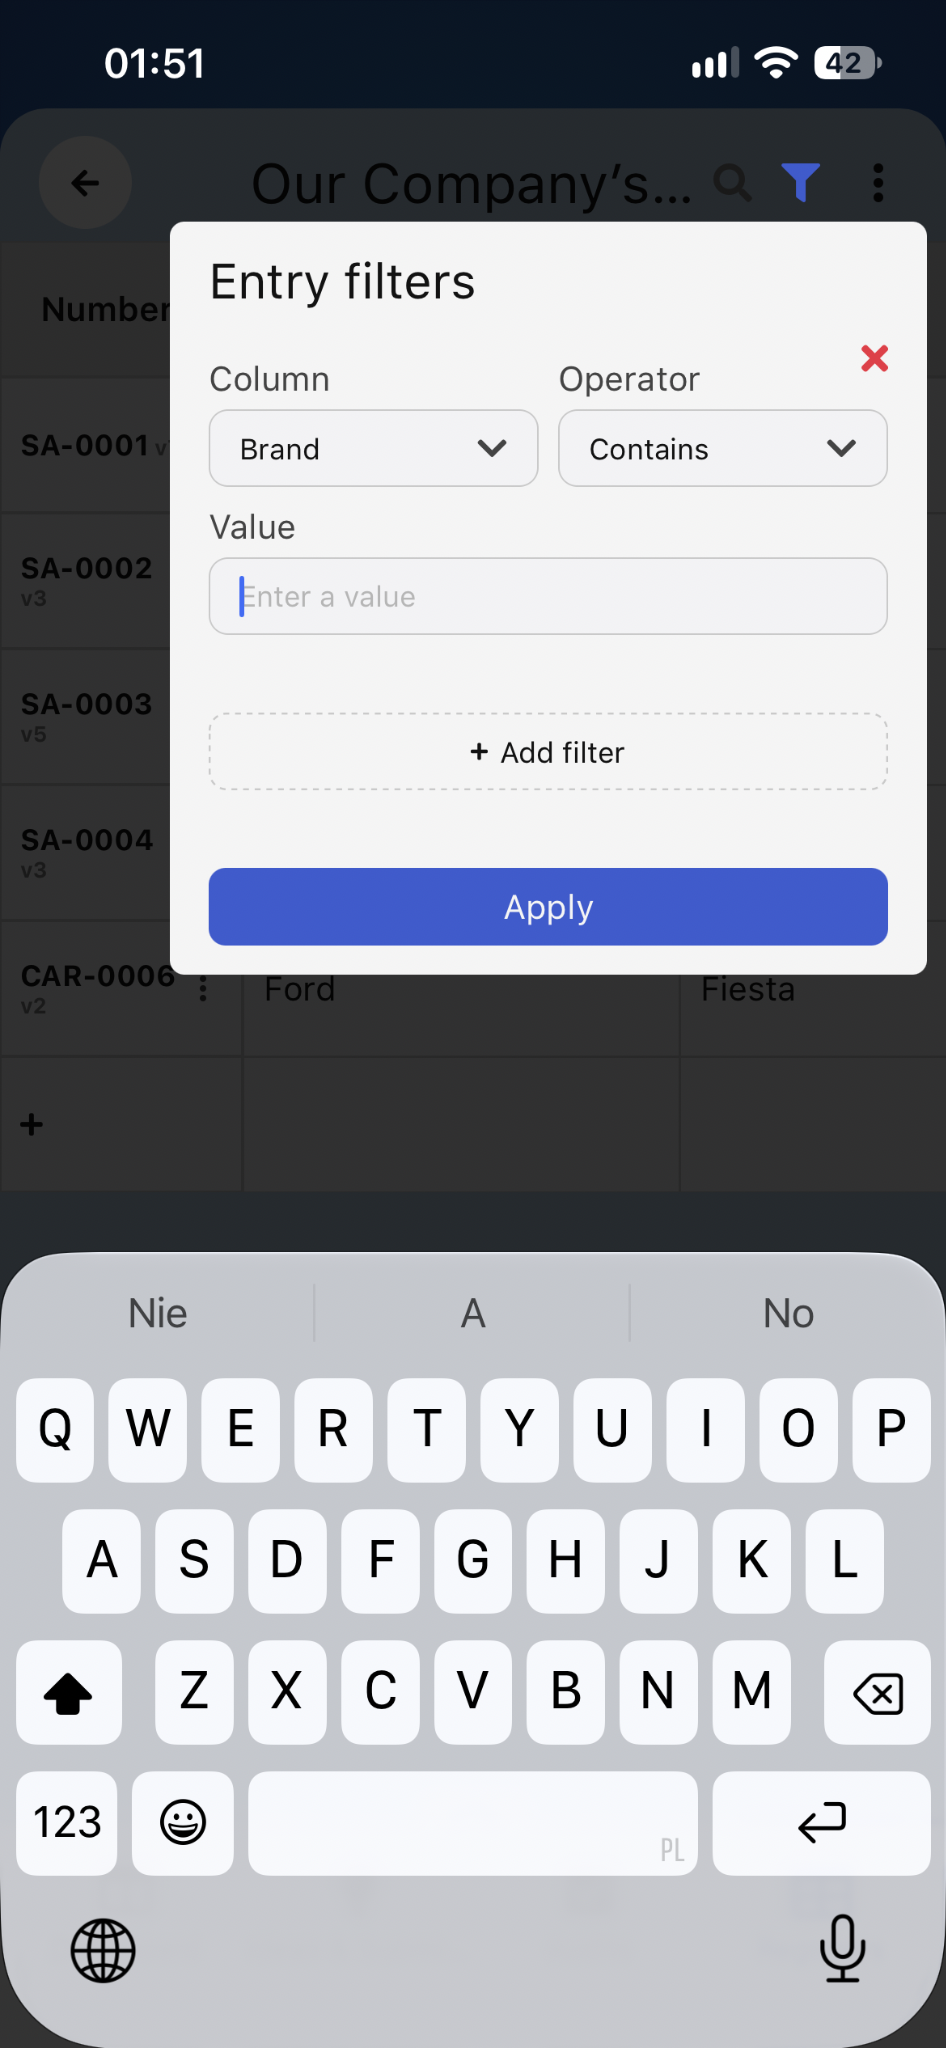
To apply a filter:
- Select the Column.
- Select the Operator.
- Enter the Value.
- Tap Apply.
For example, to find vehicles of a particular brand, select Brand, choose Contains, and enter Audi.
The + Add filter button adds another condition. The red × next to a condition removes it.
Register menu
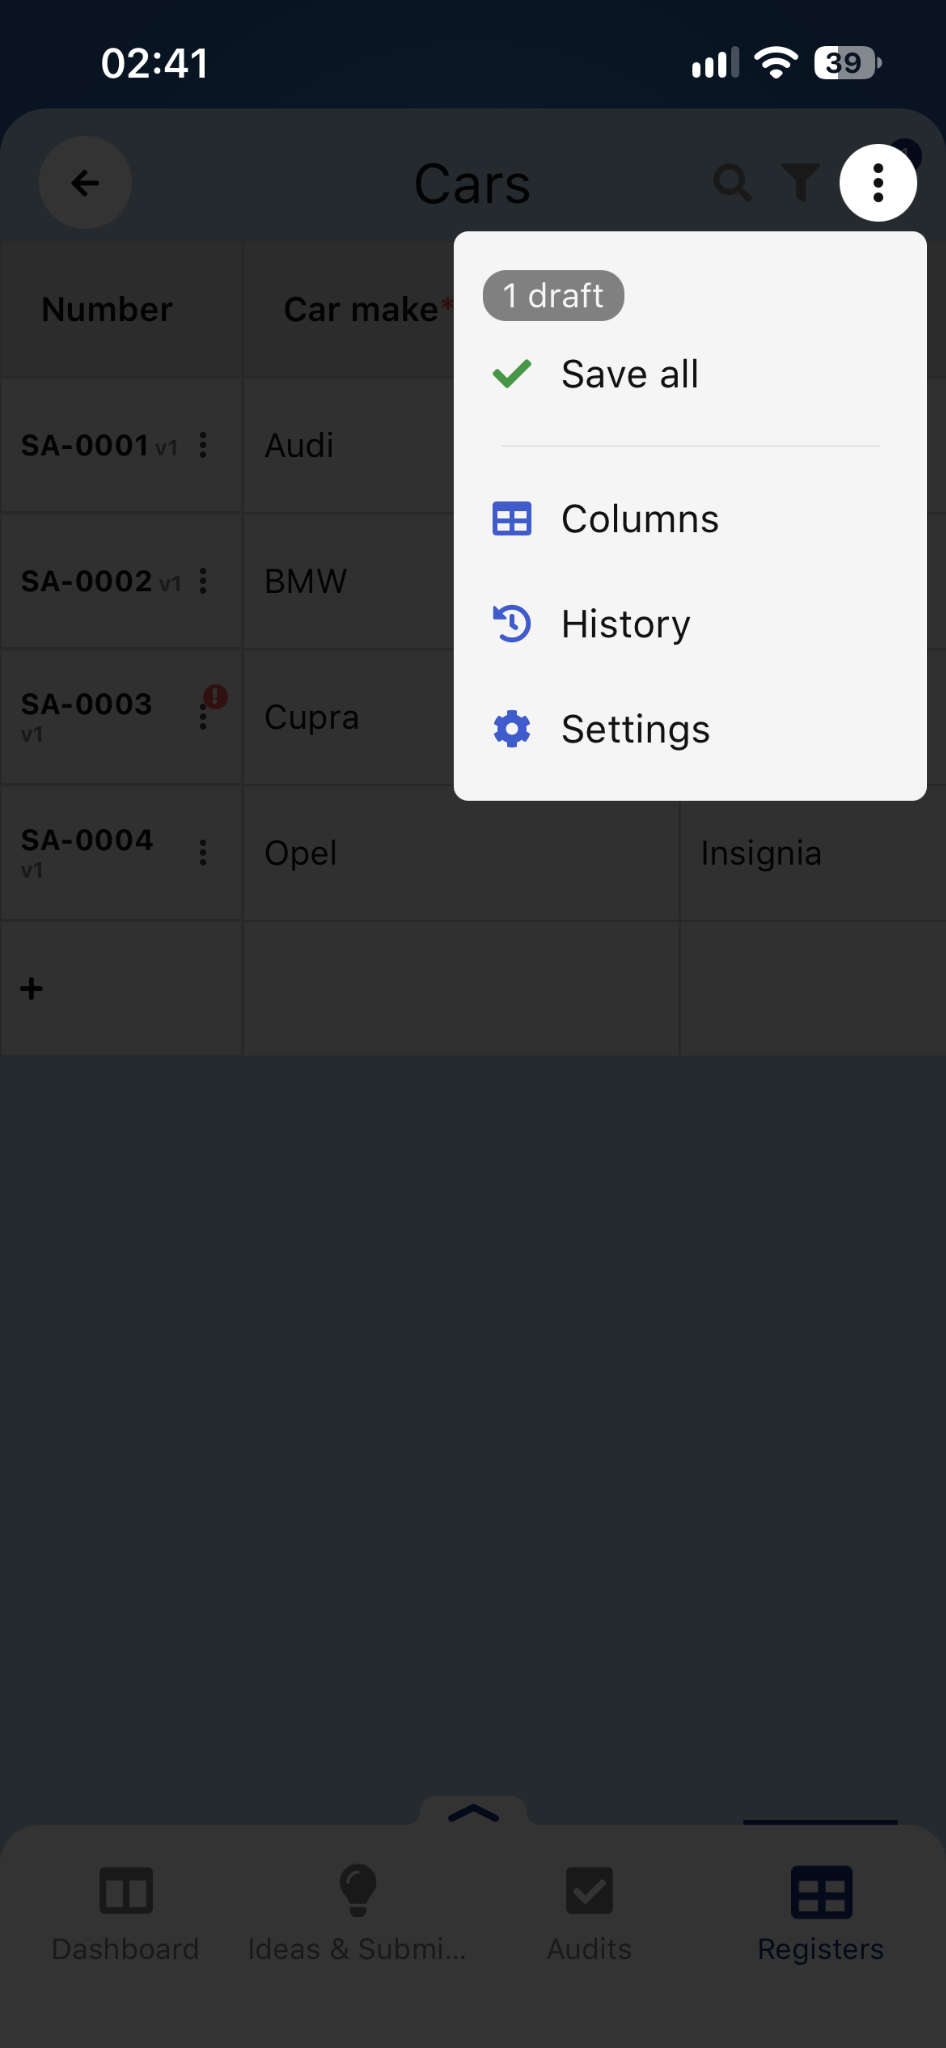
The three dots menu in the upper-right corner contains the following options:
| Option | Purpose |
|---|---|
| Columns | Manage column order, visibility, and settings. |
| History | Review the register’s change history. |
| Settings | Open the register settings. |
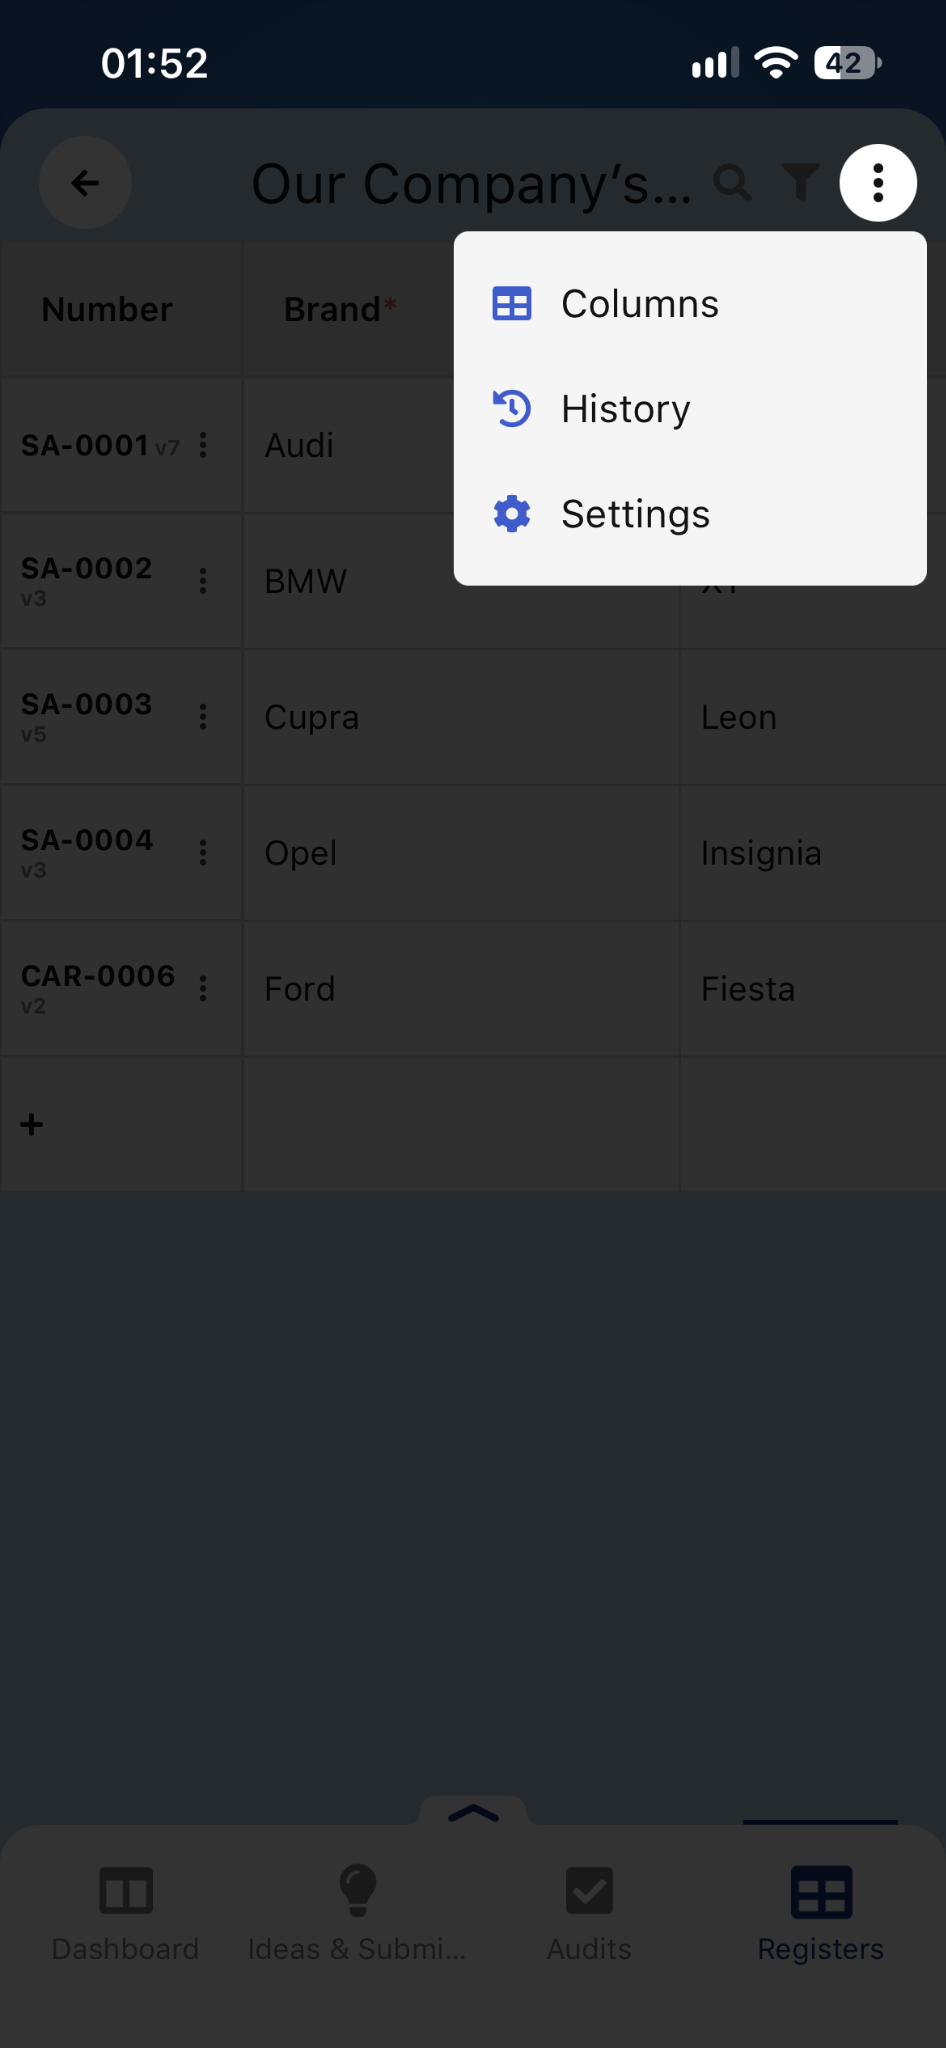
When entries have unsaved changes, the menu also provides Save all and information about the number of drafts. Saving is described in Saving and discarding changes.
Adding and editing entries
Adding an entry
A row marked with a + symbol appears at the bottom of the table. To start adding an entry, tap this symbol and fill in the fields according to their column types. Fields marked with an asterisk are required.
Opening an entry
To view an entry’s details:
- Find the entry you want to view in the table.
- Tap the three dots icon next to its number.
- Select Open entry.
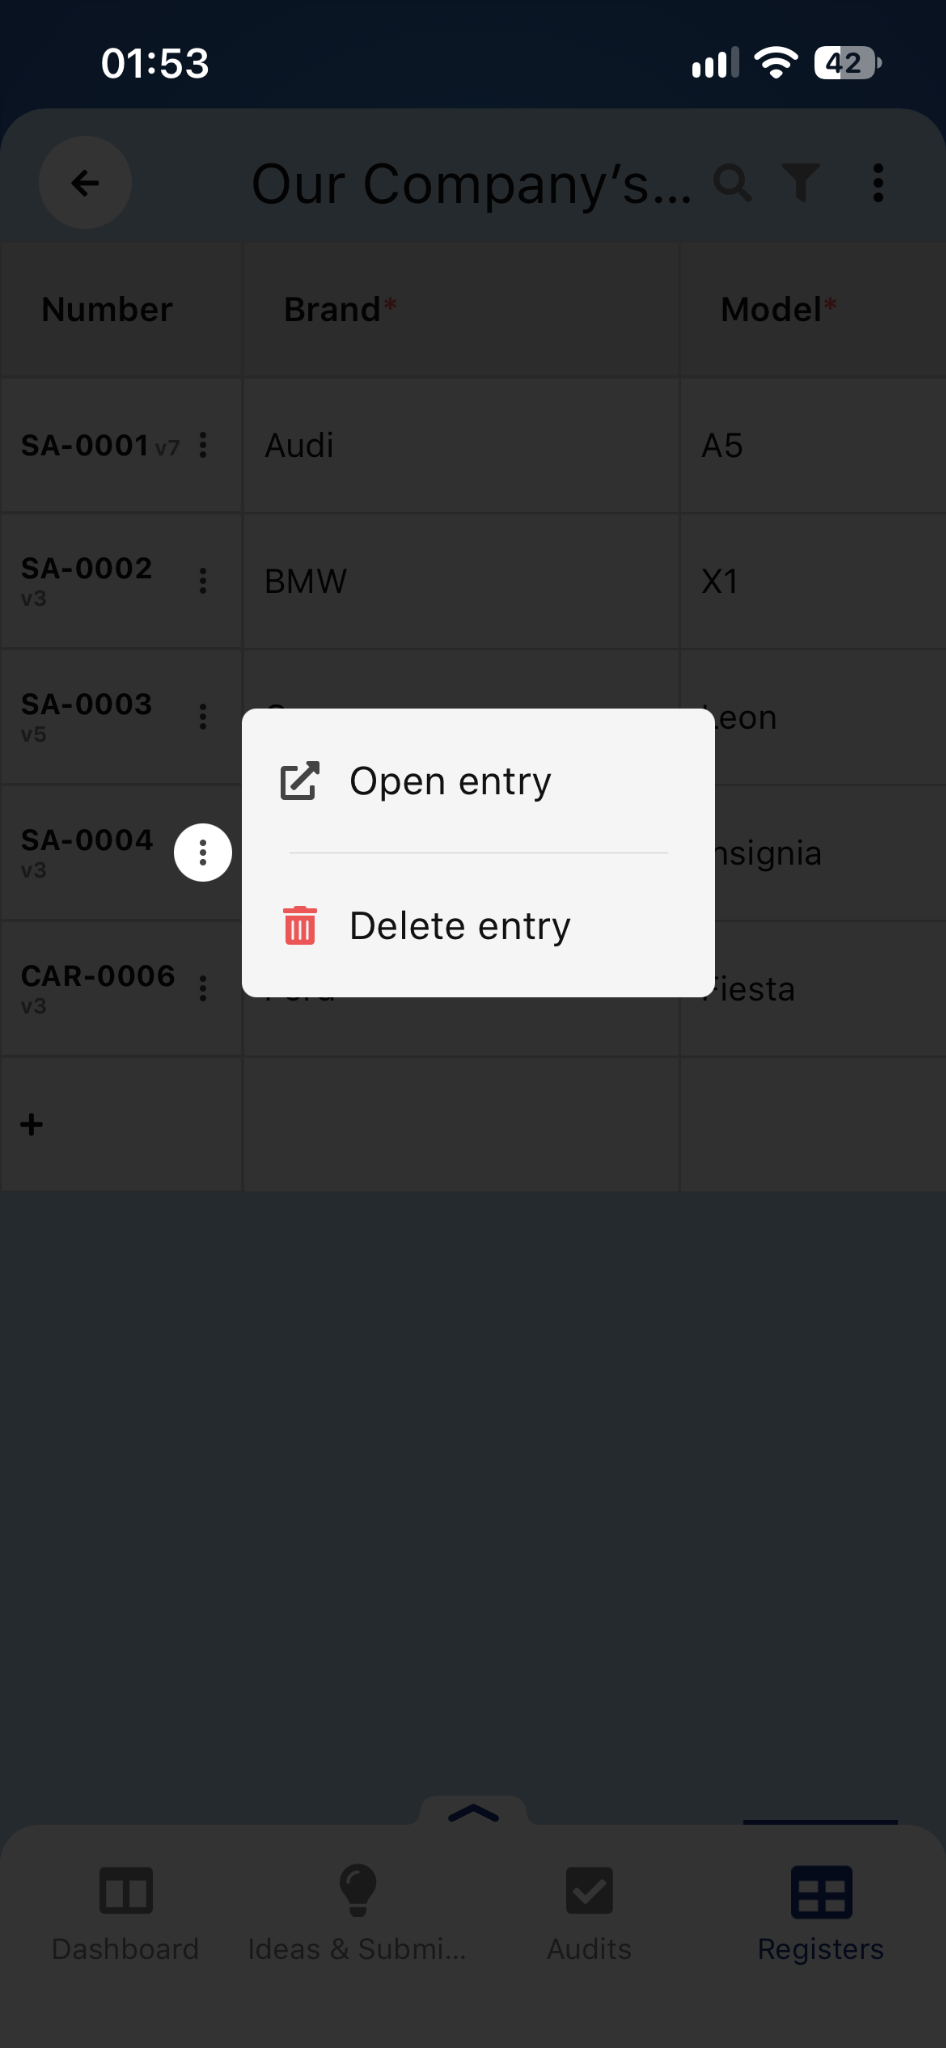
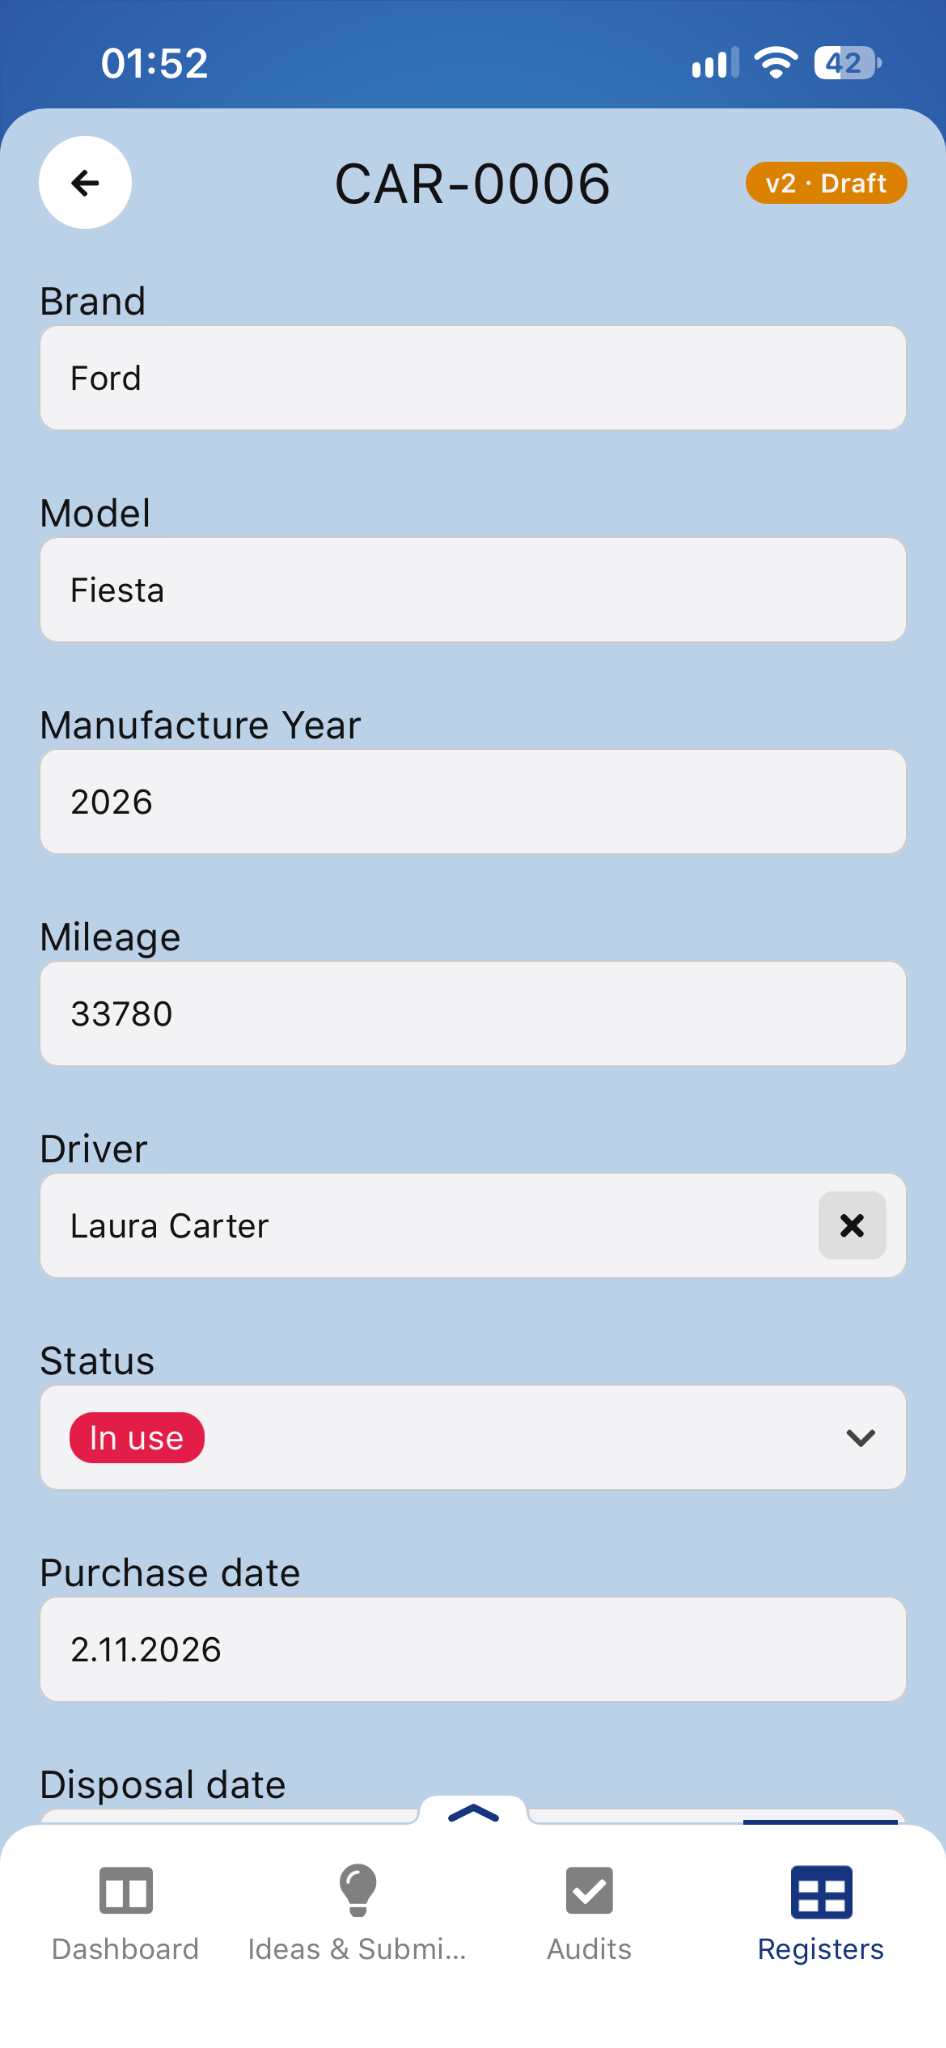
The entry number and version appear in the header. The form below contains fields corresponding to the register’s columns. Scroll down to view the remaining information. The screenshots show the menu for SA-0004 and the details of a separate example entry, CAR-0006.
The draft shown for CAR-0006 contains Brand: Ford, Model: Fiesta, Manufacture Year: 2026, and Mileage: 33780. Laura Carter is selected in Driver, and Status is set to In use. The v2 · Draft badge indicates that the entry has unsaved changes.
Completing entry data
Enter data according to the field type. Text and number fields accept values, lists allow you to select options, and a Yes/No field lets you select an answer.
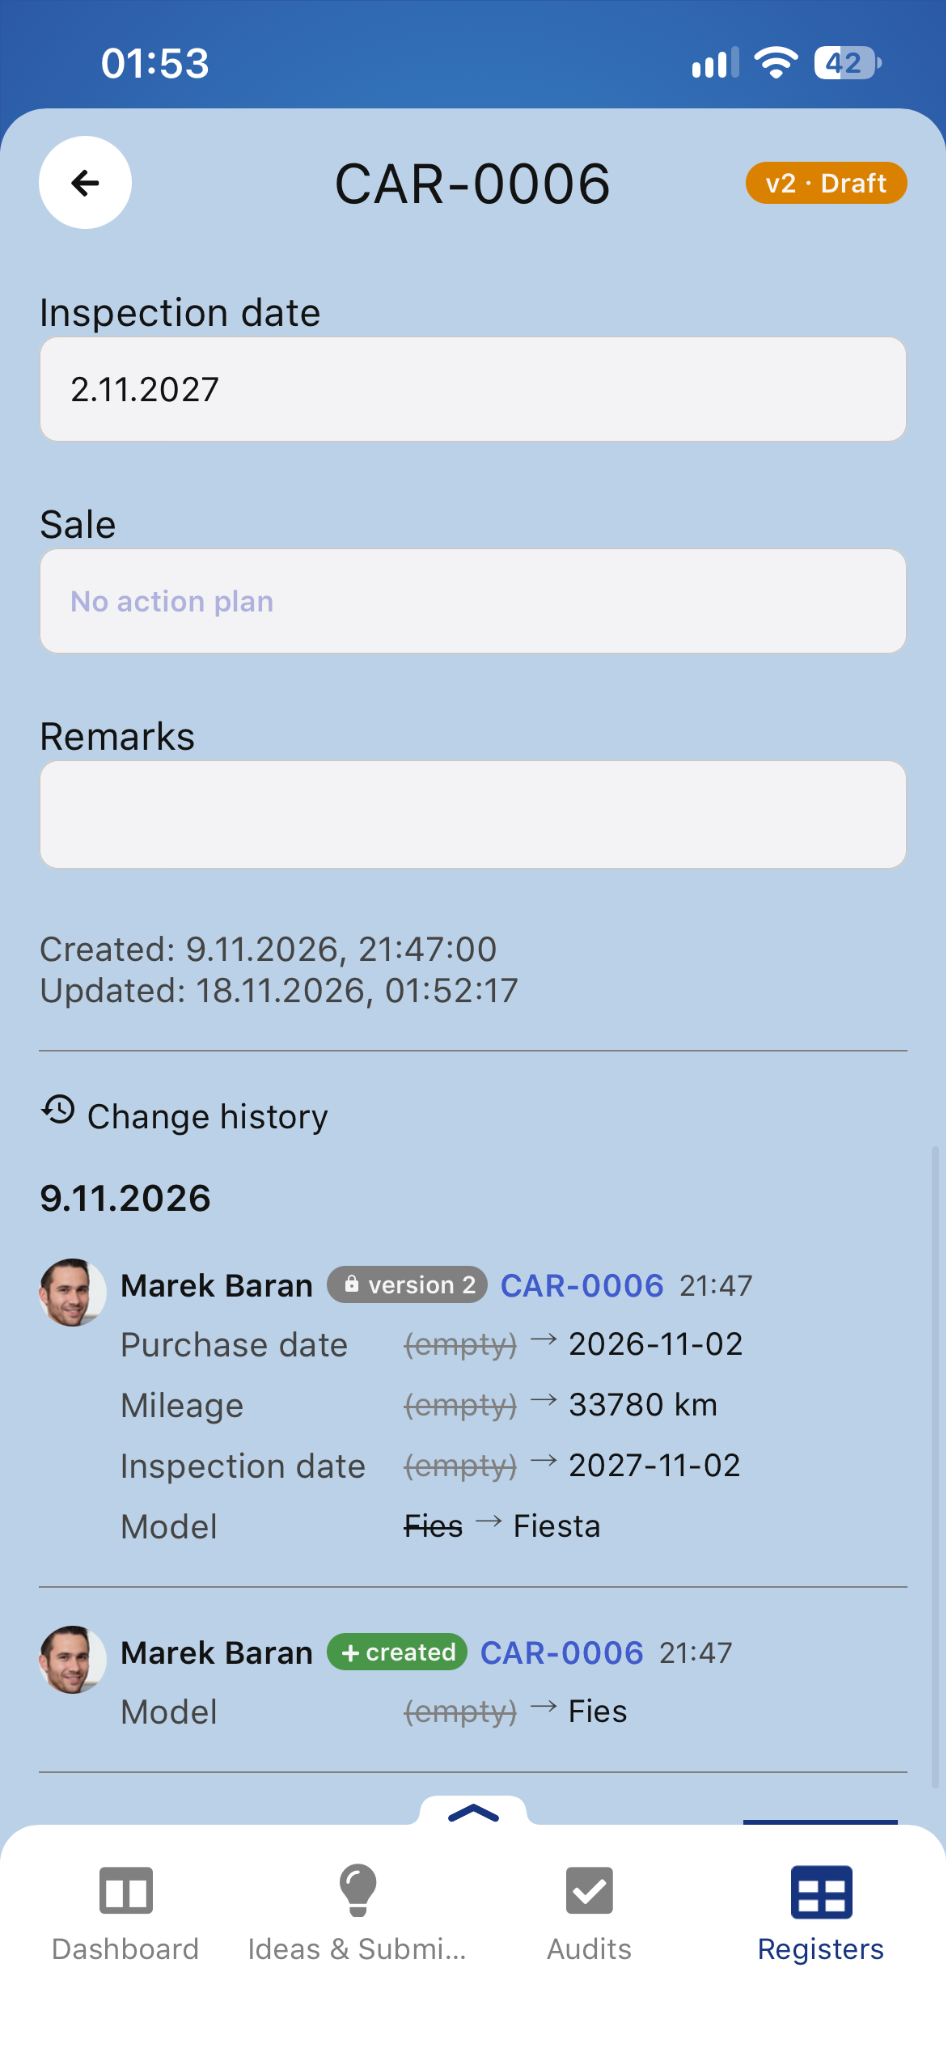
The example shows:
- Purchase date - 2.11.2026, visible in the entry form above.
- Inspection date - 2.11.2027.
- Sale - No action plan.
- Remarks - empty.
- Created and Updated - the entry’s creation and last update timestamps.
An Action plan column links an entry to a plan and displays the linked plan’s number and status. In this example, the Sale field shows No action plan, so no plan is linked to the entry. For instructions on working with plans, see Action plans in the mobile app.
Saving and discarding changes
Changes to entries are kept as drafts until they are confirmed. From the table, you can save one entry or all prepared drafts.
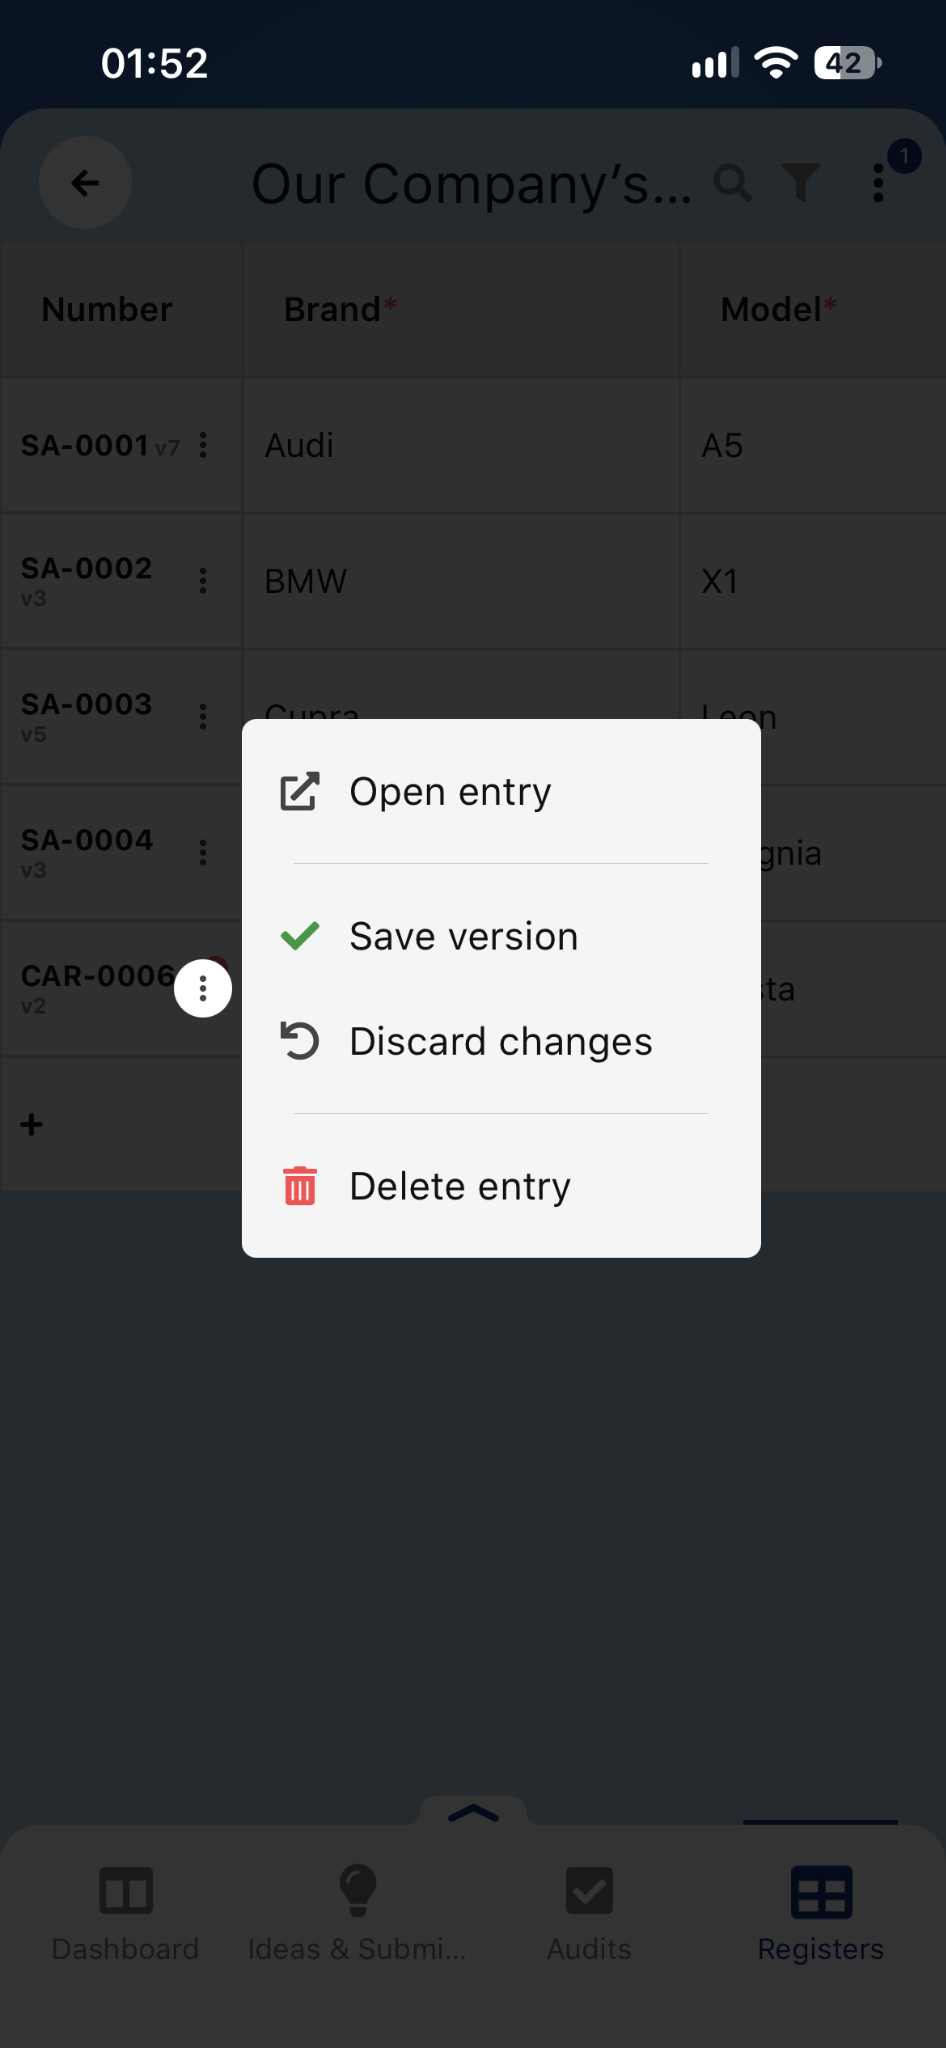
To confirm changes to one entry, open the menu next to its number and select Save version. Select Discard changes to discard that entry’s unsaved changes.
To save all drafts, open the register menu in the upper-right corner and select Save all. In the menu example, 1 draft indicates that one entry has unsaved changes.
💡 After editing data, save the entry version or use Save all to confirm the changes you have made.
Deleting an entry
To delete an entry, open the menu next to its number and select Delete entry. The ability to delete entries depends on your permissions.
Managing columns
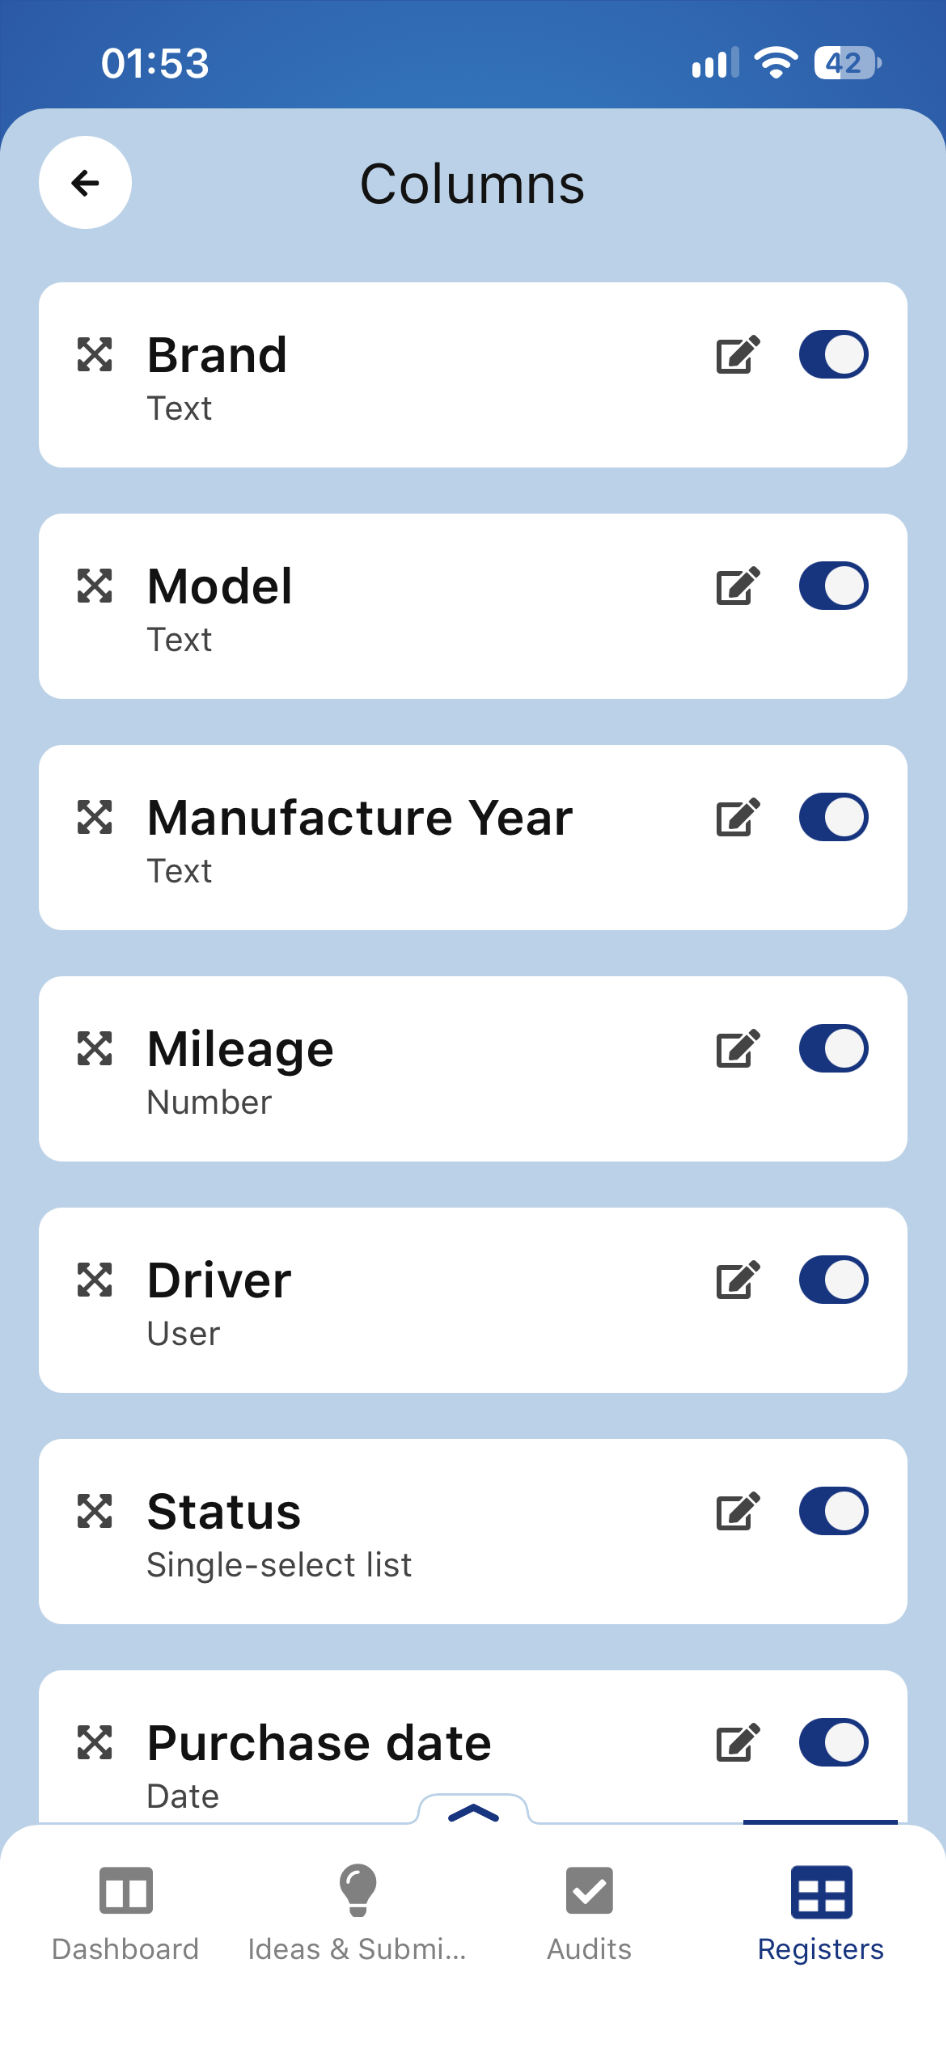
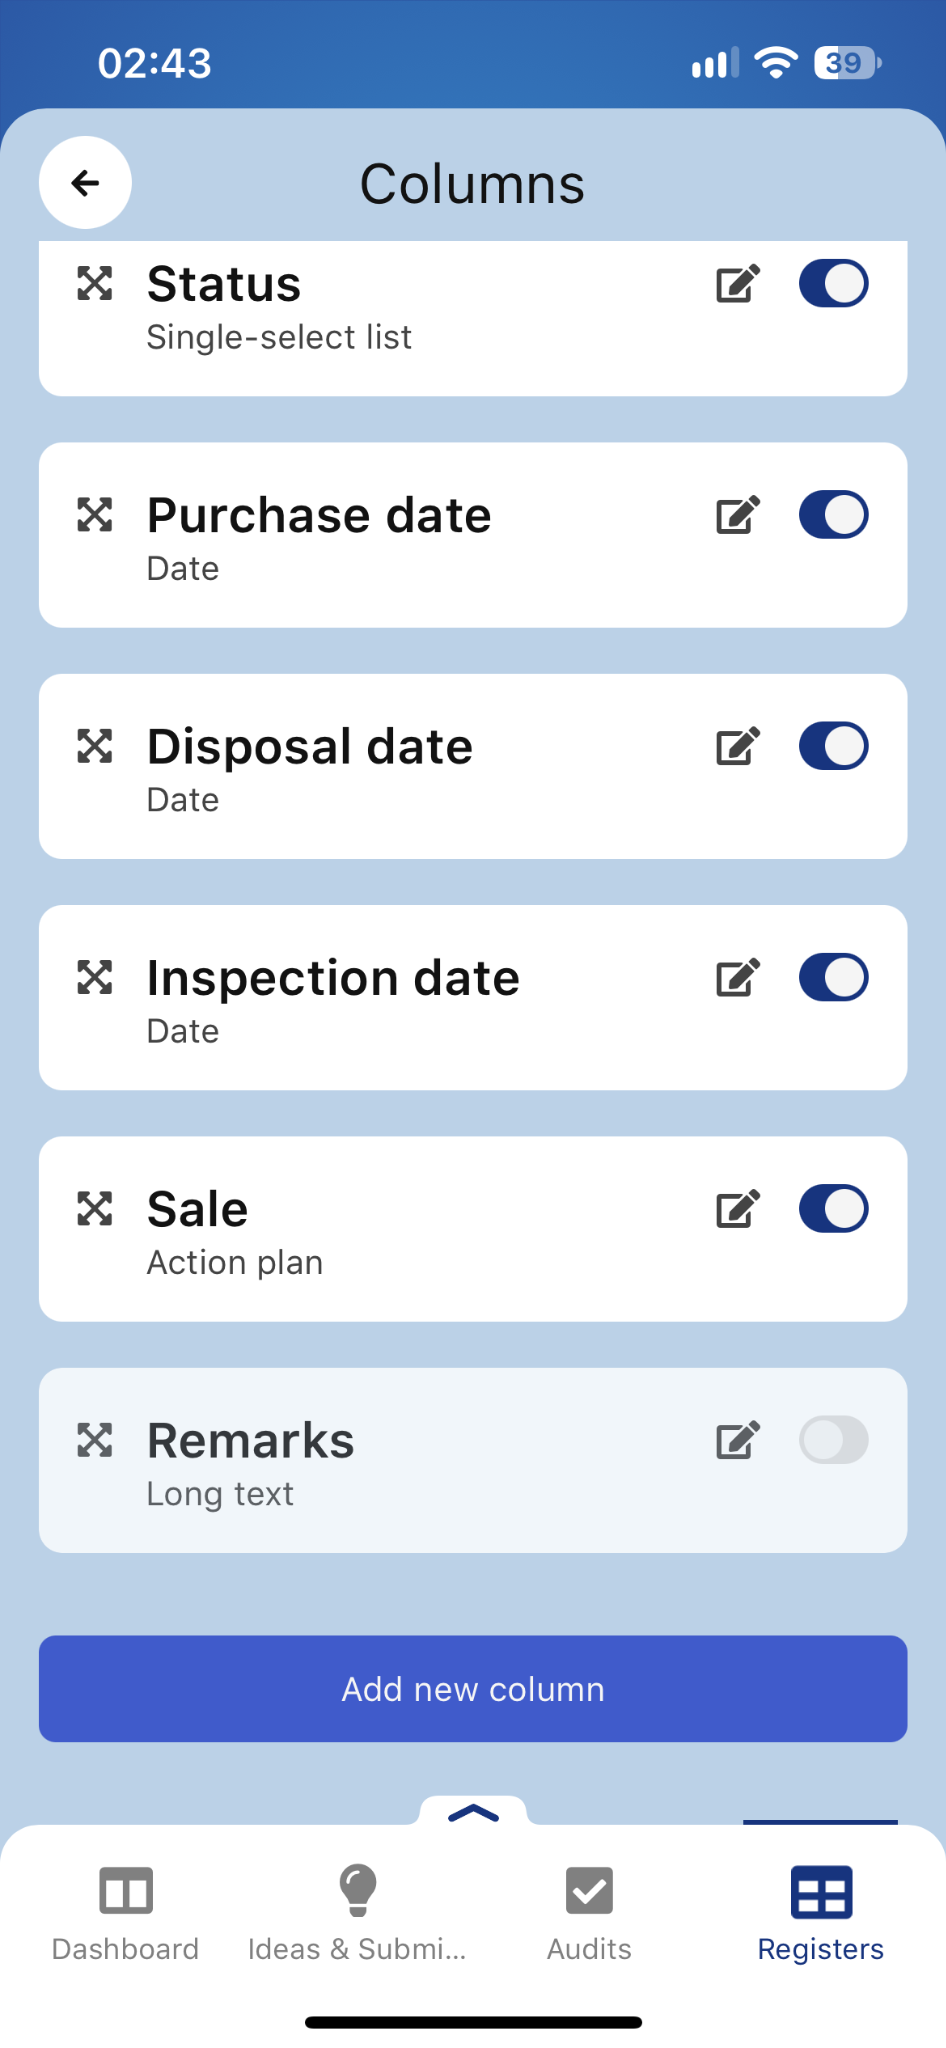
To configure columns, open the register menu and select Columns. Each column appears as a separate card displaying its name and data type.
Each column has:
- An arrow handle - drag the card to change its position.
- An edit icon - open the column settings form.
- A switch - show or hide the column in the table.
In the screenshot, visibility is turned off for Remarks. To display the column in the table again, turn on the switch next to its name.
Editing a column
Tapping the edit icon expands the card and displays the form.
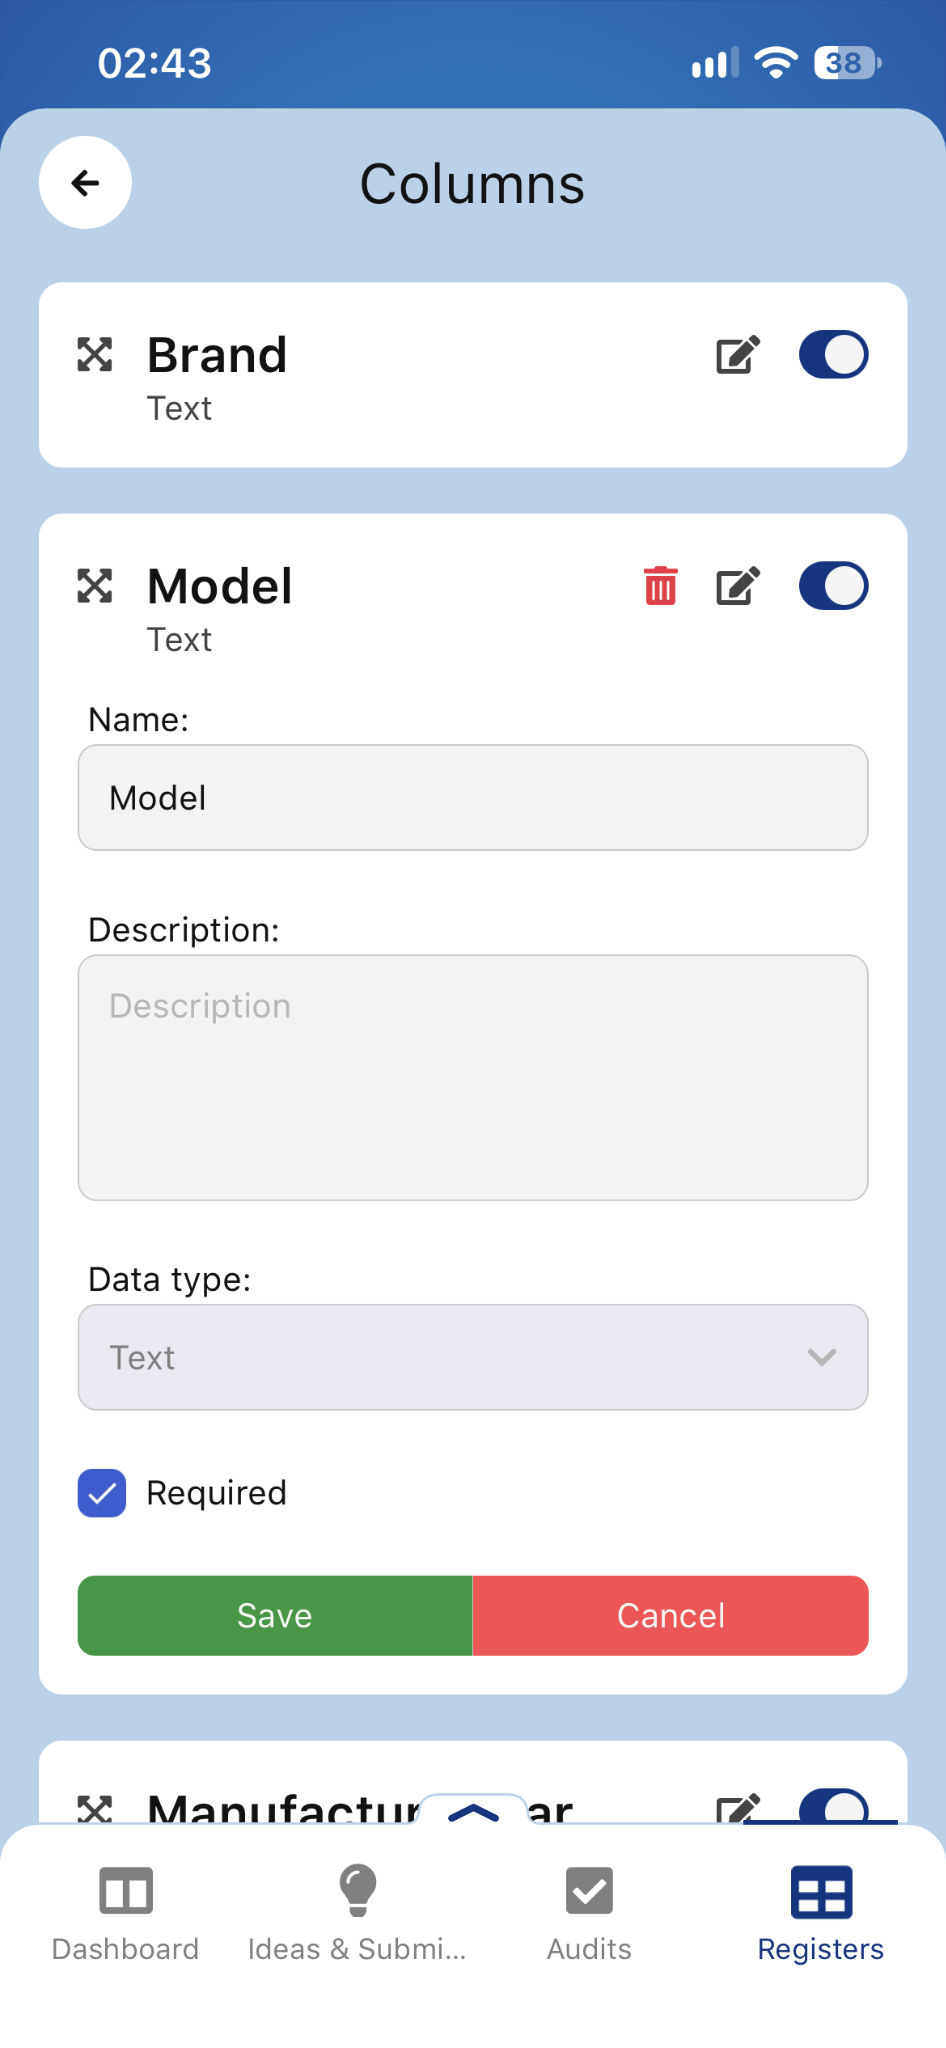
The form contains the following fields:
- Name - the column name displayed in the register.
- Description - additional information about the column.
- Data type - the type of information stored, e.g. Text.
- Required - determines whether the field must be completed in an entry.
Tap Save to confirm changes or Cancel to discard them. The expanded Model card also contains a red trash can icon for deleting the column.
Adding a column
The Add new column button appears at the bottom of the column list.
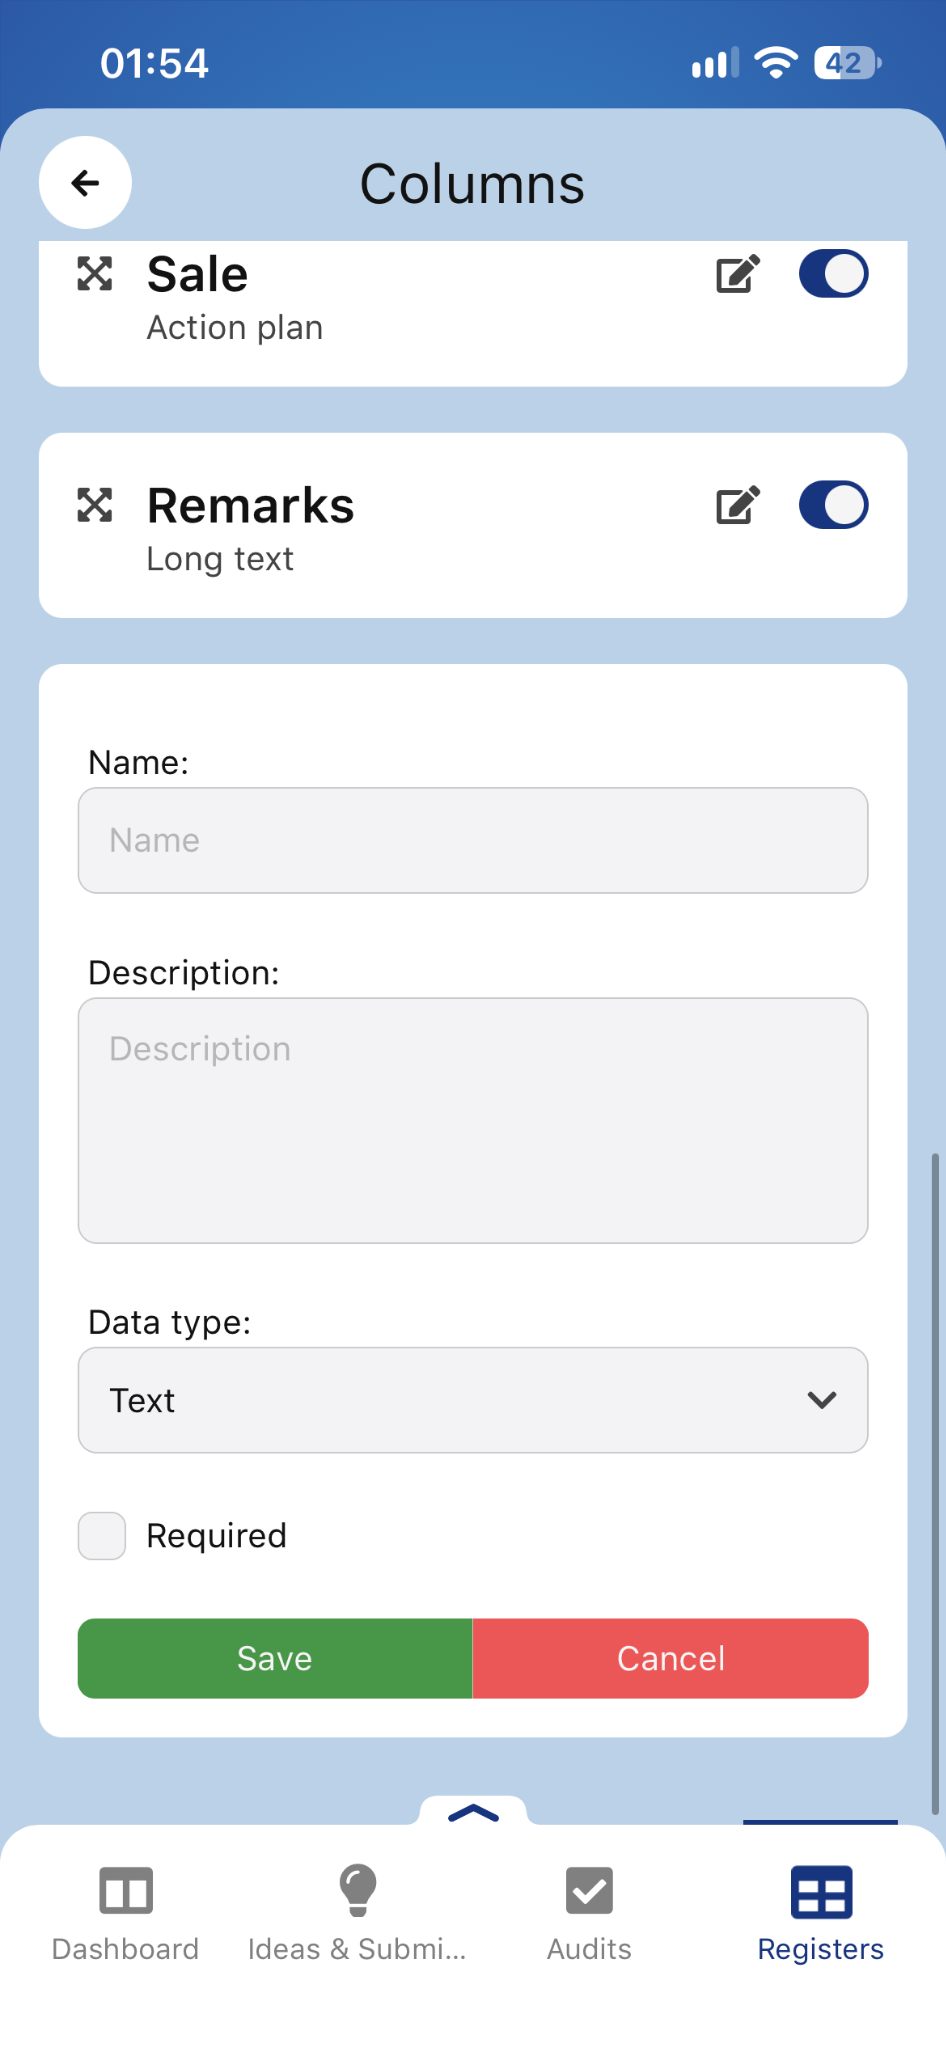
To add a column:
- Tap Add new column.
- Enter the Name and, optionally, a Description.
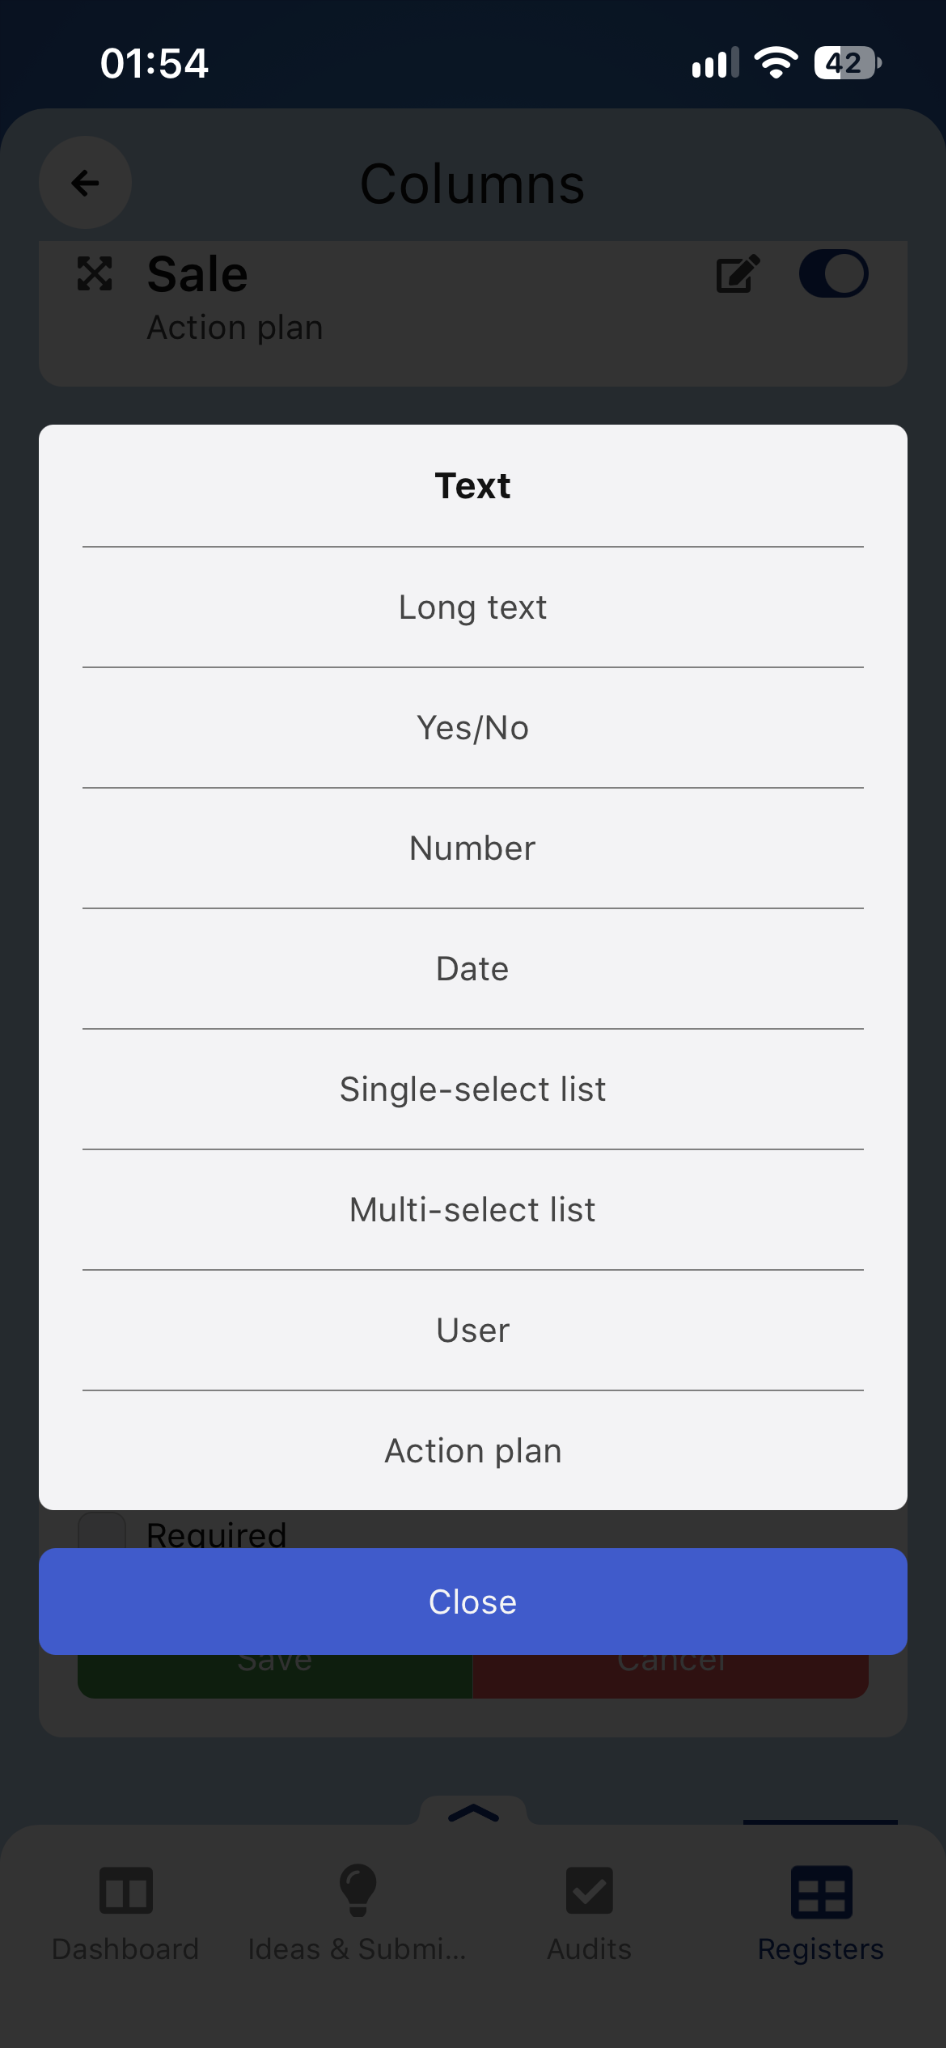
- Select the Data type.
- Select Required if needed.
- Tap Save.
The data type selection window includes a Close button that returns you to the form.
Column types
The following data types are available in the app:
| Data type | Example use |
|---|---|
| Text | Brand, Model, or Manufacture Year, as configured in the example. |
| Long text | Remarks about an entry. |
| Yes/No | A yes/no answer to a register-specific question. |
| Number | Mileage. |
| Date | Purchase date, Disposal date, or Inspection date. |
| Single-select list | Vehicle status, e.g. In use. |
| Multi-select list | Selecting several options, e.g. insurance types: third-party liability (OC), comprehensive cover (AC), and personal accident cover (NNW). |
| User | The driver assigned to a vehicle. |
| Action plan | A plan linked to an entry, using a column such as Sale. |
Change history
Register history
The History option in the register menu opens the change history for the entire register. Tap the three dots icon in the upper-right corner and select History.
Entry history
An entry’s history is available in its details. Select Open entry from the menu next to the entry number, then scroll down to Change history.
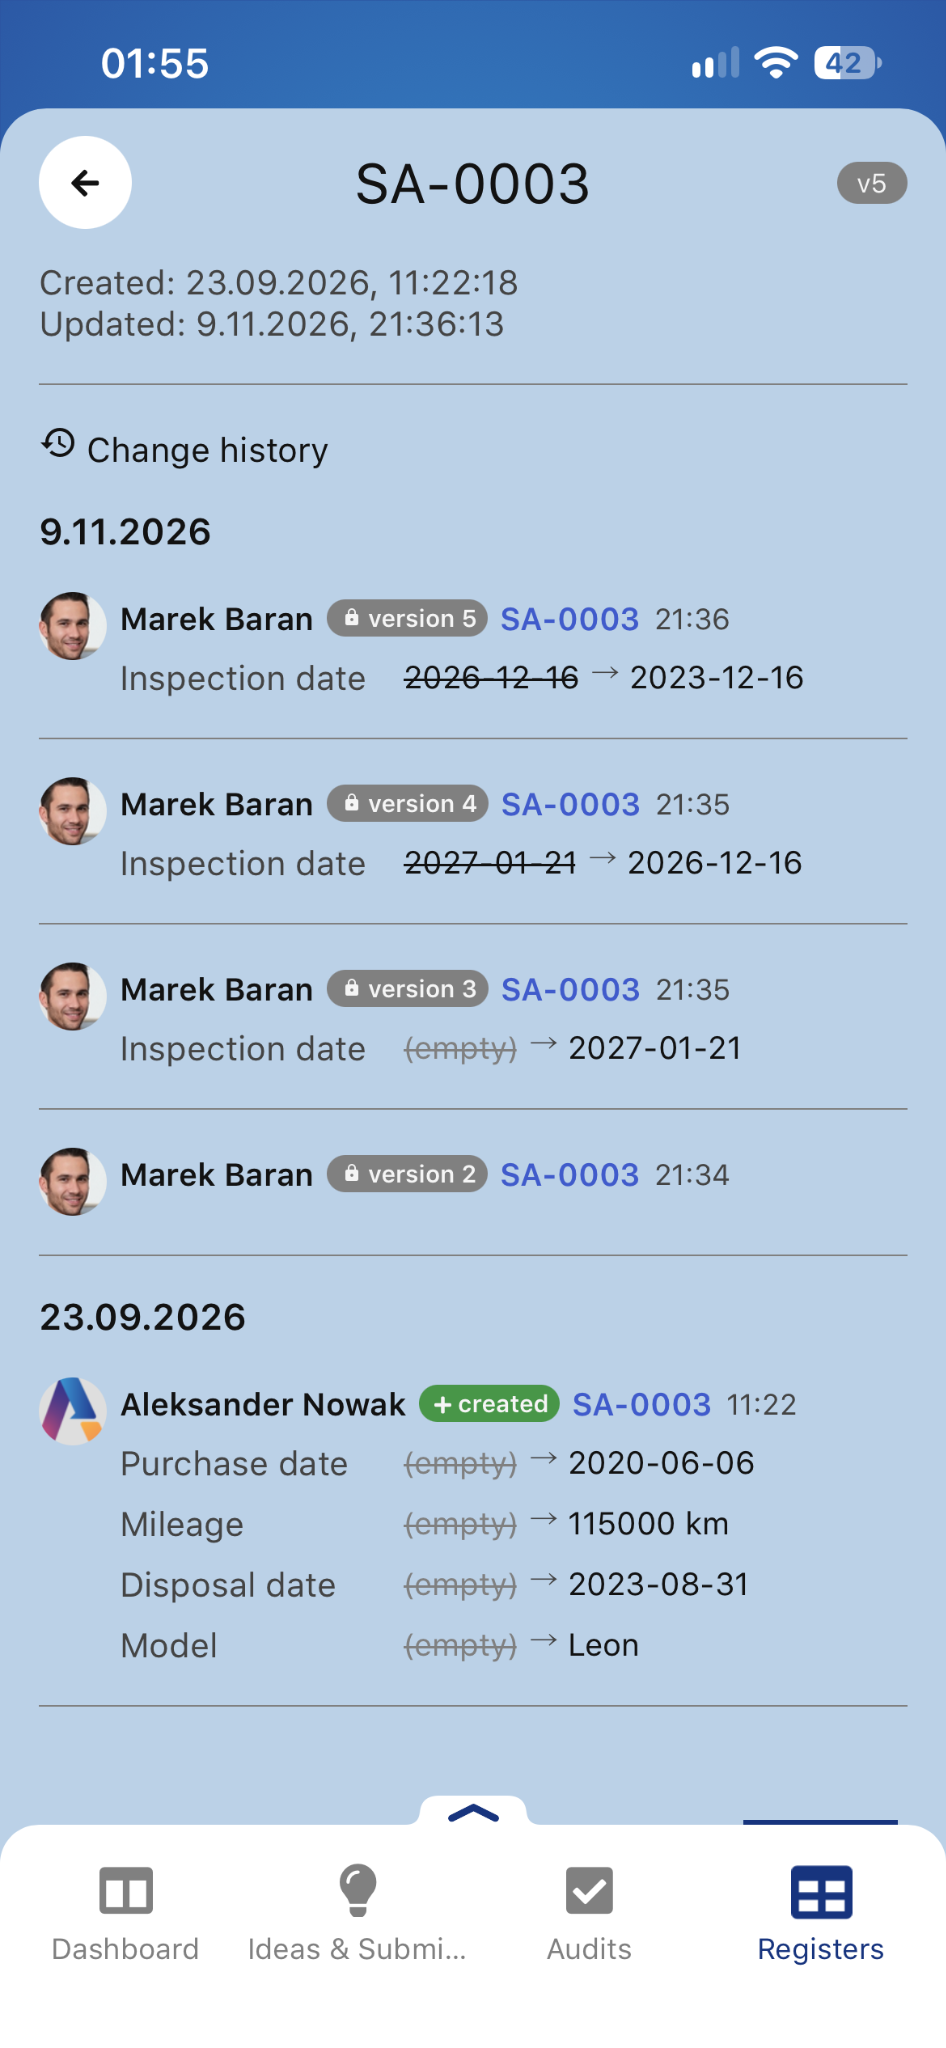
Events are grouped by date. Each operation displays the user, version label, entry number, and time. Entry creation is marked with a green + created label.
Changes to fields show the previous and new values separated by an arrow. The previous value is crossed out. (empty) indicates that the field previously had no value.
In the example, the history of SA-0003 includes the following changes on 9.11.2026:
- version 5 changes Inspection date from 2026-12-16 to 2023-12-16;
- version 4 changes Inspection date from 2027-01-21 to 2026-12-16.
The CAR-0006 history shown earlier in the entry details also records a change to Model, from Fies to Fiesta, together with saved values for Purchase date, Mileage, and Inspection date.
Register settings
To open the settings, expand the register menu and select Settings. This requires full management permissions for the register. Being assigned as an entry owner or register owner alone does not grant this permission.
For detailed role and access rules, see Registers - User permissions.